
If your ball starts off line or curves too much, your swing path is often part of the problem. I’d boil this guide down to one idea: get your club path closer to neutral, keep the face under control, and your shots tend to start straighter, curve less, and fly farther.
Here’s the short version:
- Swing path is the direction the club moves through impact.
- A path near 0° – often around ±2° – usually helps shrink misses.
- Face angle mostly affects start direction.
- Face-to-path mostly affects curve.
- A drop in smash factor from 1.48 to 1.42 at 100 mph can cost about 6 mph ball speed and roughly 15 yards.
- Divot direction can help me spot path issues with irons:
- Divot left of target: often out-to-in
- Divot right of target: often in-to-out
- Common misses often match common path patterns:
- Slice / pull: often out-to-in
- Block / hook: often in-to-out
- Setup changes that often help:
- Square alignment
- Better ball position
- Slight spine tilt away from target with driver
- Enough room from the ball
- Main drills in this guide:
- Headcover barrier drill
- Tee gate drill
- Step-through drill
- On the course, I’d stick to one cue, trust my stock shape, and track: Using a sound golf strategy helps manage these misses.
- Start line
- Curve
- Miss pattern
Here’s a fast look at the two big path problems:
| Path pattern | Usual miss | What I’d check first | First drill to try |
|---|---|---|---|
| Out-to-in | Slice or pull | Open shoulders, upper-body-first downswing | Headcover barrier drill |
| In-to-out | Block or hook | Inside takeaway, closed setup, stuck trail arm | Tee gate drill |
This guide explains the terms, shows how I can spot my pattern, lays out the main causes, and gives simple golf tips I can take from the range to the course.
Golf Downswing Drill | Fix Out-to-In Swing Path & Hit Straighter Shots
sbb-itb-bcd8bdd
Swing Path, Swing Plane, and Ball Flight Explained
Three terms show up all the time in golf instruction: swing path, face angle, and face-to-path. Once you get those down, ball flight starts to make a lot more sense.
Swing path is the clubhead’s horizontal direction through impact. Face angle is where the clubface points at impact. Face-to-path is the gap between those two numbers, and that’s the main thing that drives curve.
A lot of golfers flip this in their heads. But the ball usually starts mostly based on face angle, while swing path has more to do with how the ball curves. If the face is open relative to the path, the ball bends that way. If the face and path are close to matched, the curve shrinks fast.
Attack angle adds a vertical piece to the picture. Irons are usually hit slightly down, while drivers are usually hit slightly up, often requiring you to slow your downswing to maintain control. That matters more for contact and launch than for curve.
How Path and Clubface Produce Different Shot Shapes
Path and face work together to create shot shapes you can predict pretty well, at least for right-handed golfers:
| Shot Shape | Swing Path | Face Relative to Path | Ball Flight |
|---|---|---|---|
| Slice | Out-to-In | Open | Starts left/center, curves hard right |
| Fade | Out-to-In | Slightly open | Starts left, curves gently back to target |
| Pull | Out-to-In | Square to path | Starts left and stays left |
| Draw | In-to-Out | Closed | Starts right, curves gently back to target |
| Hook | In-to-Out | Closed | Starts right/center, curves hard left |
| Block/Push | In-to-Out | Square to path | Starts right and stays right |
Here’s the part that trips people up: a pull and a slice can come from the same out-to-in path. The difference is the face. If the face matches the path, you get the pull. If it stays open to that path, you get the slice.
Same story on the other side. A block and a hook can both come from an in-to-out path. The face-to-path relationship decides which one shows up.
How to Identify Your Current Swing Path
The fastest no-tech way to check your path is to look at your iron divot direction after iron shots. For right-handed golfers, a divot that points left of the target almost always means an out-to-in path. If it points right, that usually means in-to-out.
Ball flight gives you the next clue. If the ball starts left and bends right, your path is out-to-in and the face is open to it. If the ball starts right and stays right, your path is in-to-out and the face is pretty much matching that path.
During range sessions, keep this simple checklist in mind:
- Iron divot direction: Left of target = out-to-in. Right = in-to-out.
- Start direction: Mostly tells you where the face was pointing at impact.
- Curve direction: Tells you the face-to-path relationship.
- Alignment sticks: Put them on the ground to give yourself a clear baseline for swing path during range sessions.
If you have a launch monitor, check the Club Path and Face Angle numbers directly. A club path near zero is usually neutral. That makes it much easier to see whether your miss is coming from the path, the face, or both.
Common Swing Path Faults and Their Root Causes
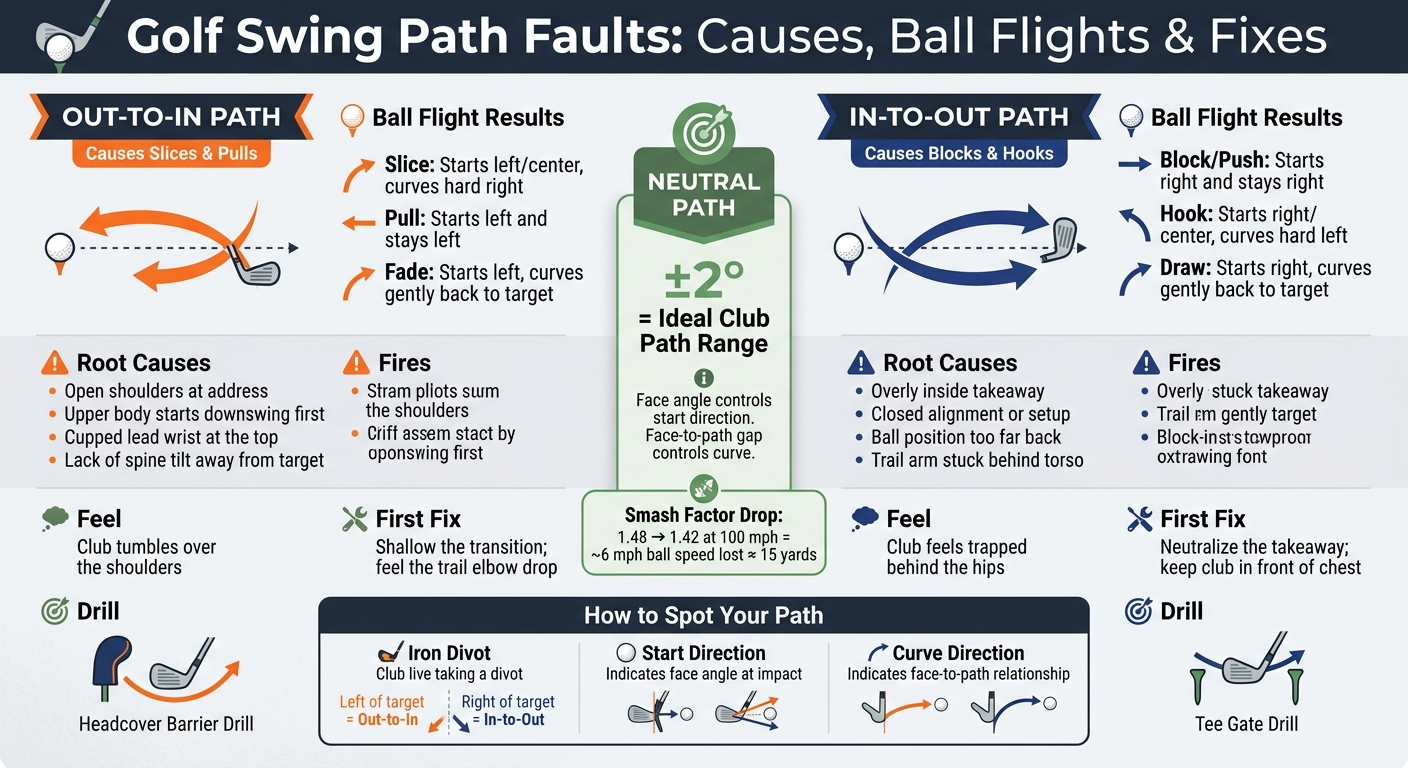
Golf Swing Path Faults: Causes, Ball Flights & Fixes
If your divot and start line already hint at a path problem, this is where you track down why it’s happening. Most swing-path faults come back to two big patterns: over-the-top (out-to-in) or stuck from the inside (in-to-out).
Each one tends to produce its own kind of miss. And each usually starts from a different spot in the swing. So the point here isn’t just to say, “That was a slice,” or “That was a hook.” It’s to figure out the swing position that set it in motion to quickly improve your golf game.
Out-to-In Path: The Cause of Slices and Pulls
This pattern often begins before the club even starts down. Open shoulders at address or a lack of spine tilt away from the target can push the motion in the wrong direction. A cupped lead wrist at the top can leave the clubface open too.
Then comes the big trigger: the upper body starts the downswing first. When that happens, the club moves outside the target line and cuts across the ball. That’s the recipe for a slice or a pull.
Too Far In-to-Out: The Cause of Blocks and Hooks
This issue usually starts with the club moving too far inside early. An overly inside takeaway, closed alignment, or a ball position too far back can all send the club too much from the inside.

If the trail arm gets stuck behind the torso, things get even messier. The club can get trapped, and the ball may start right and stay there, or turn hard over into a hook. That’s where blocks and hooks tend to show up.
Fault Comparison Table: Ball Flight, Cause, and First Fix
| Fault | Typical Ball Flight | Likely Root Cause | Feel | First Fix |
|---|---|---|---|---|
| Over-the-Top | Slice or Pull | Upper-body dominant transition; open shoulders at address | Club "tumbles" over the shoulders | Shallow the transition; feel the trail elbow drop |
| Stuck Inside | Block or Hook | Overly inside takeaway; closed alignment; trail arm pinned | Club feels trapped behind the hips | Neutralize the takeaway; keep the club in front of the chest |
Start by matching the ball flight. Then test the first fix listed for that pattern. Once you tie the miss to the cause, the next section walks through the setup changes and drills that help clean it up.
Setup Fundamentals and Drills for a More Neutral Swing Path
Once you’ve pinned down the fault, the next job is simple: build a setup that doesn’t make it worse.
Setup and Backswing Positions That Support Better Path
Your setup can either help the club travel on a better path or push it off track before the swing even starts.
- Set your feet, hips, and shoulders parallel to the target line.
- Use a slightly stronger grip if the face stays open. That means both hands are turned a bit toward the trail side.
- Play the driver off your lead heel or a touch farther forward.
- Tilt your spine slightly away from the target.
- Stand far enough from the ball so your hips don’t crowd it.
A good way to think about it: grip and lead-wrist control help deal with an open face, while alignment, ball position, and posture help clean up path. When those pieces are in place, the drills below give you a simple way to rehearse the right motion.
3 Drills to Fix Slice, Hook, and Contact Problems
Start with the drill that matches your main miss. Use the headcover drill for slices, the tee gate for path control, and the step-through drill for sequencing.
- Headcover Barrier Drill (for over-the-top / slice)
Place a headcover just outside the target line and slightly ahead of the ball. Then make swings without touching it. The main feel is simple: miss the barrier on the downswing.
- Tee Gate Drill (for path control through impact)
Set two tees slightly wider than the clubhead and swing through the gate. If you clip the outside tee, your path is out-to-in. If you clip the inside tee, you’re coming too far in-to-out. The feel here is straightforward: swing cleanly through the gate.
- Step-Through Drill (for sequencing and center contact)
Start with your feet together. As the club gets to the top, step toward the lead foot. This drill helps with sequencing and center contact. The feel is pressure moving into the lead foot before impact.
Bringing Swing Path Changes to the Course
On-Course Adjustments for Tight Fairways, Trouble, and Wind
Use the same start-line and curve checks from practice to confirm your pattern on the course. Before your round, take 5 focused swings during warm-up to check your path for the day. That short check can tell you early if you’re drifting out-to-in or in-to-out before you ever hit your first tee shot.
Pick one swing cue and stay with it for the whole round. Don’t try to patch three things at once in the middle of play. A simple tempo cue, like keeping the backswing and downswing in a 3:1 ratio, can help you stay calm when the pressure kicks in. And when it’s windy, work with the breeze. Don’t force a different path just because the weather gets in the way.
When the fairway gets narrow or trouble sits in play, trust your stock shot shape instead of trying to fight it. Aim for your start line, then allow for the curve you expect. If you want a higher launch and a later clubface release, move the ball slightly forward in your stance. If you want a lower flight with more control, move it slightly back.
After each round, track three things:
- Start line
- Curve
- Miss pattern
That tells you what’s going on. If the ball starts on line and then curves, the face-to-path gap is still off. If it starts offline, the clubface is the bigger issue. The main thing is to watch patterns over several rounds, not obsess over one swing. That’s how you see if your practice is carrying over to the course.
Conclusion: The Key Moves That Improve Path Fastest
Once your path is steady in practice, your job on the course is to protect it. Be honest about your miss: slices and pulls often point to an out-to-in path, while blocks and hooks often point to an in-to-out path. Clean up your setup and transition before you add anything else. Then use the drills that fit your fault and keep tracking your start line and miss pattern over time, not just for one round. Your path improves faster when you practice with a clear plan and check if it’s paying off.
FAQs
How do I know if path or face is the problem?
Check how your face angle and swing path work together. Face angle controls about 75% to 85% of the ball’s starting direction. The gap between face and path is what creates the curve.
If your path is neutral but the ball flight is still off, the face angle is probably the issue. For example, if your path is neutral and you still hit a slice, the face is open relative to the path.
What swing path numbers should I aim for?
Aim for a neutral swing path: 0 degrees relative to your target line.
Here’s the simple version:
- A negative number means an out-to-in path
- A positive number means an in-to-out path
But one exact number isn’t the whole story. What matters more is the relationship between club path and face angle, because that gap is what controls the ball’s curve.

For a neutral shot, the face should be square to the path.
Which drill should I start with for my miss?
First, figure out whether your main miss comes from swing path or contact. Then stick with one fault at a time for 1 to 2 weeks.
That part matters more than most golfers think. If you try to fix everything at once, you usually end up spinning your wheels.
Here’s the simple game plan:
- Slice / over-the-top path: use the Barrier Drill and the Motorcycle Drill for lead-wrist flexion
- Flipping the club: use the P6 Drill
- General practice: make slow-motion swings before you go to full speed
Keep it simple. Work the same issue long enough to see a pattern, then adjust from there.
Related Blog Posts
- Why Does My Golf Ball Slice? Expert Solutions Explained
- Inside-Out vs. Outside-In Swing Path: Key Differences
- Fixing Swing Path Problems: Common Mistakes
- Ultimate Guide to Clubface Control
