
If you swing over the top, I’d fix 3 things first: club path, transition, and body sequence. This article lays out 5 drills that do exactly that: Alignment Stick Gate, Headcover Obstacle, Pump Drill, Step and Feet-Together, and Wall or Net Slide.
I’d start with a 7-iron at 50% to 70% speed because the downswing lasts only about 0.2 to 0.35 seconds. That means I need slow reps and clear feedback, not hard swings. The article’s main point is simple: use barriers to fix path, use rehearsals to fix transition, and use footwork to fix sequence.
Here’s the whole article in one quick list:
- Alignment Stick Gate: trains a less out-to-in path
- Headcover Obstacle: helps me approach more from the inside
- Pump Drill: teaches the lower body to start down first
- Step and Feet-Together: fixes timing, balance, and hip-led motion
- Wall or Net Slide: gives me a hard boundary so the club doesn’t move out early
What I’d take away: if I’m slicing or pulling shots, I should start slow, use one drill at a time, and build speed only when contact and path stay under control.
The Golf Fix – Stop Coming Over the Top | Golf Channel
sbb-itb-bcd8bdd
Quick Comparison
| Drill | What I use it for | Main feedback | Best place to start |
|---|---|---|---|
| Alignment Stick Gate | Fix out-to-in path | I hit or miss the stick | Half-swings with a 7-iron |
| Headcover Obstacle | Train an inside approach | I hit or miss the headcover | Half-swings at the range or net |
| Pump Drill | Fix transition | Video shows club dropping inside | Slow pumps, then half-swings |
| Step and Feet-Together | Fix sequence and balance | My balance and timing | 50% to 70% speed |
| Wall or Net Slide | Keep the club from moving out | I touch or clear the barrier | Slow reps, often without a ball |
If I wanted one simple plan, I’d go path first, then transition, then sequence. That’s the full article in short form.
Why These Drills Work
These drills clean up the path, sequence, and space problems that lead to an over-the-top move. Put simply, they train the path, the order of motion, and the feedback you need so you can see what the club is actually doing.
A headcover set about 8 inches outside the ball and a little behind it gives instant feedback. If the club comes over the top, it runs into the obstacle. That pushes you toward a more inside approach instead. It also helps stop the upper body from firing down too early.
The downswing happens fast – just 0.2 to 0.35 seconds. That’s why slow rehearsals matter so much. They help you improve your golf game with the right motion pattern: pelvis, then torso, then arms. Start with a physical barrier first, because it gives the club a clear path to follow.
Think of speed as a checkpoint, not the goal. Begin at 50% to 70% speed, then add more only when contact stays solid. If the motion falls apart, stay at that speed until it starts to hold up. Start with the first drill to map the club’s path.
1. Alignment Stick Path Gate Drill
What It Fixes
This drill helps you train a less out-to-in club path, which is the main pattern behind an over-the-top move. If the club keeps clipping the gate, your downswing is still working from outside the target line.
Feedback
Set an alignment stick just outside the ball to make a gate. Then swing through without touching it. If you hit the stick, the club is still coming over the top.
When the path cleans up, you should start seeing a straighter launch and less curve to the right.
Speed and Reps
Hit 10 to 15 half-swings at 50% speed. Only add speed after you can make clean passes through the gate more than once. If the club starts hitting the gate again, back off to the last speed where you had control and stay there for a bit.
Setup
Use a 7-iron and one alignment stick.
Once you can move through the gate cleanly at speed, go to the headcover drill next. It builds on the same path feel, but with a bigger visual barrier.
2. Headcover Obstacle Drill
What It Fixes
This drill teaches an inside approach. It also helps get rid of the out-to-in path that leads to slices and lost distance.
Feedback
The feedback is simple. If the club comes over the top, it hits the headcover. If you miss it cleanly, the club is coming in from inside the target line.
Speed and Reps
Start with half-swings. After you can miss the obstacle again and again, move up to full swings.
Setup
Use a headcover or a rolled towel with a 7-iron. You can practice at the range or hit into a net.
Once you can miss the headcover on a regular basis, move to the pump drill to rehearse the downswing sequence.

3. Pump Drill
The Pump Drill takes that shallow feeling and turns it into a motion you can repeat. The goal is simple: teach the lower body to start the downswing so the upper body doesn’t jump in too early.
Feedback
Film your swing from down the line and check one thing: on each pump, the clubhead should drop inside the target line, not move out toward the ball.
Speed and Reps
Pause at the top, make 2–3 slow pumps toward your trail hip, then swing through with the lower body leading. After that starts to feel normal, move into slow-motion golf lessons half-swings with a 7-iron, then build up to full swings.
Setup
Use a phone tripod to check the motion. Set it up at the range or at home so you can make sure the club is shallowing during the transition.
Once the club starts dropping inside on a steady basis, move to the Step and Feet-Together Drill to train a better sequence.
4. Step and Feet-Together Drill
This drill builds on the shallow move from the pump drill by adding footwork. The goal is simple: train the lower body to begin the downswing before the shoulders jump in.
Primary Swing Fault Corrected
This drill goes after a common miss: the shoulders start first, the club moves out, and you cut across the ball. The step and feet-together versions make your pelvis lead the motion, which helps keep the downswing on line.
Main Feedback Source
Your balance tells the story. If you stumble during the step, your setup or timing is off.
Try to feel the lead foot plant before the hands drop. That small piece of timing helps the lower body stay in front. Use video or a mirror to check that your spine angle stays steady and that your hips rotate instead of sliding.
Best Practice Speed and Shot Length
Begin at 50% to 70% speed with half to three-quarter swings. Go to full swings only when the motion stays balanced.
Ideal Setup Space or Training Aid
You just need enough room for a half swing. Start without a ball until the footwork feels automatic. It also helps to pause for one second at the top so the shoulders don’t rush down.
Once the step starts to feel natural, the wall or net drill can help you keep that same inside path with a clear boundary.
5. Wall or Net Slide Drill
Use this drill after the step-and-feet-together work. It helps you keep the club on an inside path while adding a hard boundary.
Here’s the idea: set up next to a wall or net so it blocks the club from drifting outside the target line on the downswing. If your club moves out too early, the barrier will tell you right away.
Primary Swing Fault Corrected
This drill is built to fix the over-the-top move. It trains the club to stay inside the target line instead of cutting across the ball.
Main Feedback Source
The wall or net gives instant feedback. If you make contact, the club is still moving out. If you clear the barrier cleanly, your path is heading in the right direction.
Best Practice Speed and Shot Length
Start with slow half-swings. Then work up to fuller swings only after you can clear the barrier over and over without hitting it.
Ideal Setup Space or Training Aid
Use a 7-iron, foam or airflow balls indoors, and a phone or mirror to check that the club is shallowing on the way down.
Once you can clear the barrier cleanly, move to the comparison table to pick the best golf tips for your miss.
Drill Comparison Table
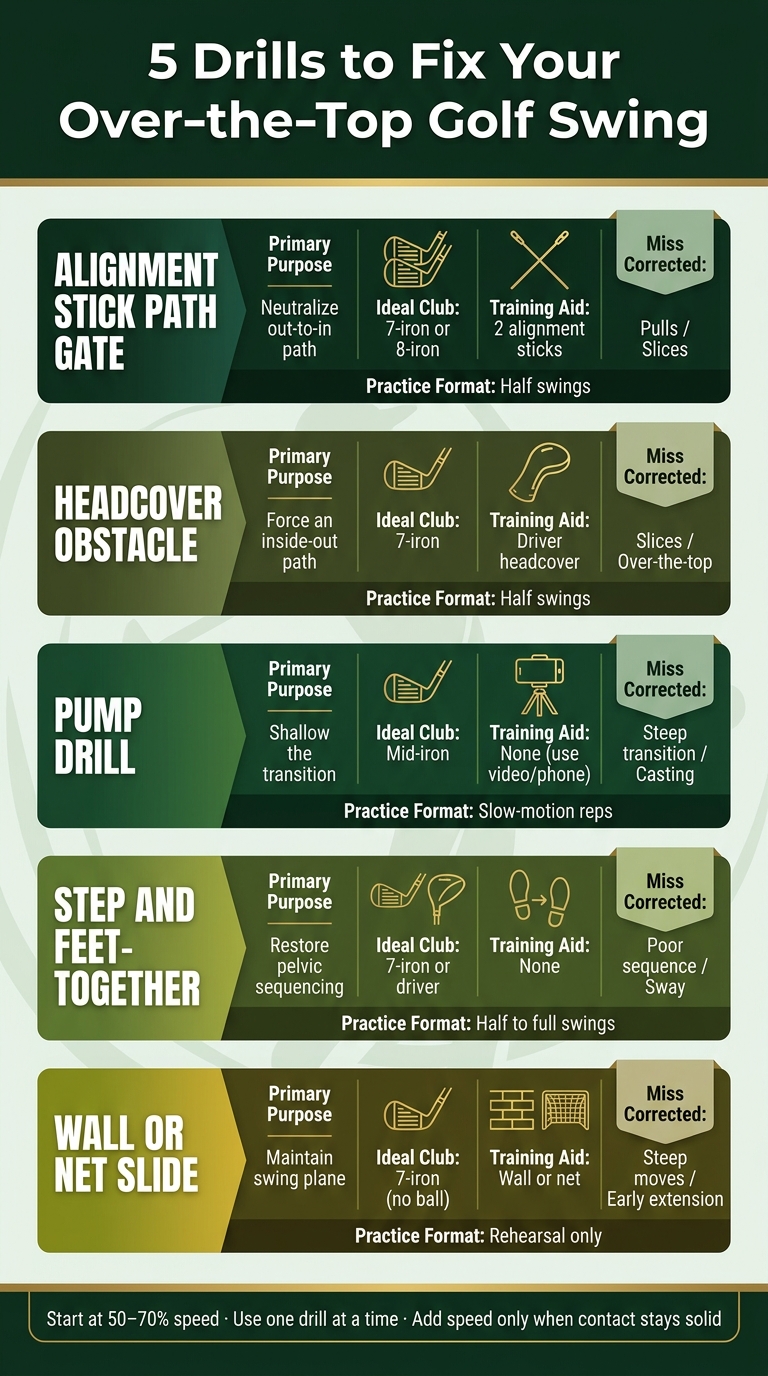
5 Drills to Fix Over-the-Top Golf Swings: Quick Comparison Guide
Use this table to match your miss, setup, and practice space with the drill that fits best.

| Drill | Primary Purpose | Ideal Club | Practice Format | Training Aid | Miss Corrected |
|---|---|---|---|---|---|
| Alignment Stick Path Gate | Neutralize out-to-in path | 7-iron or 8-iron | Half swings | 2 alignment sticks | Pulls / Slices |
| Headcover Obstacle | Force an inside-out path | 7-iron | Half swings | Driver headcover | Slices / Over-the-top |
| Pump Drill | Shallow the transition | Mid-iron | Slow-motion reps | None | Steep transition / Casting |
| Step and Feet-Together | Restore pelvic sequencing | 7-iron or driver | Half to full swings | None | Poor sequence / Sway |
| Wall or Net Slide | Maintain spine angle and swing plane | No ball | Rehearsal only | Wall or net | Steep moves / Early extension |
If your miss is a slice, start with the Headcover Obstacle drill. It gives you a clear feel for coming from the inside instead of chopping across the ball.
When your motion falls apart because the body and arms stop working together, go with Step and Feet-Together. If the steep move shows up right at the top and into transition, the Pump Drill is usually the better fix.
Wall or Net Slide works well for indoor reps or warm-up rehearsals when you want a firm boundary. It’s simple, but that hard reference can tell you a lot.
Once you’ve picked the right drill, use the 45-minute practice plan below to organize your reps.
How to Build a 45-Minute Practice Session
Keep your sessions short so your mechanics stay sharp. A good target is 40 to 60 balls total, split into three blocks. The flow should match the drill order above: path, shallowing, then sequencing.
| Block | Time | Drill | Reps |
|---|---|---|---|
| Warm-Up | Minutes 0–5 | Easy half-swings with a wedge | 10–15 swings |
| Path Feedback | Minutes 5–18 | Headcover Obstacle or Alignment Stick Gate | 15–20 balls |
| Transition Work | Minutes 18–30 | Pump Drill | 10–15 balls |
| Sequencing & Balance | Minutes 30–45 | Step and Feet-Together + Wall or Net Slide | 10 balls + 15 reps without a ball |
The point of this golf strategy is simple: each block works on one fix at a time. That matters. If you try to fix path, transition, and balance all at once, things can get messy fast.
Start with 5 minutes of easy wedge half-swings. Shorter clubs make path issues easier to spot, so they help you feel the right motion before you add length. In the path block, use the obstacle as a check, not the main event. Keep your attention on club path only.
For transition work, use the pump drill to check sequencing. Hit 10 to 15 balls at about 70% speed. Add speed only when the motion feels stable.
Finish with the Step and Feet-Together drill, then wrap up with wall or net reps to confirm that same path. These rehearsals help lock in the move without the pressure of hitting a ball. The goal here isn’t to do a little of everything. It’s to build one cleaner pattern before moving on.
Conclusion
Work through these drills in order and the fix gets a lot more repeatable. Most over-the-top swings come from poor sequencing and an out-to-in path, so you need to train both at the same time if you want the change to stick.
The Alignment Stick Gate and Headcover Obstacle drills clean up your path. The Pump Drill helps your transition. The Step and Feet-Together drill sorts out sequencing. The Wall or Net Slide drill trains that inside move. Put them together in this order, and you’ll usually see the change show up sooner.
The fix is pretty simple: start with slow reps, use clear feedback, and add speed bit by bit. Slow reps with clear feedback beat random swing thoughts almost every time.
For more drills, swing fixes, and practice plans, How To Break 80 offers video courses, eBooks, and free guides.
FAQs
Which drill should I start with first?
Start with your swing path. An out-to-in path is the main reason golfers come over the top, so that’s the first thing to clean up. The headcover drill is a great way to start.
Set a headcover or small towel about 8 inches outside the ball and a bit behind it on your target line. If your club cuts across the ball from out to in, you’ll hit the obstacle right away. Practice this first with a 7-iron, since it’s usually easier to control when you’re making swing changes.
How do I know if I’m still coming over the top?
Check your ball flight first. If you keep hitting slices or pulls, the club is often moving outside-in at impact.
Want a clearer read? Use a launch monitor and look at your club path and face angle. A negative club path usually means you’re coming over the top. And if your club path and face angle don’t line up at impact, that can confirm it.
When should I increase swing speed?
Increase swing speed only after you have a repeatable, efficient swing path and solid mechanics. Start with movement quality and sequencing. In most cases, steady timing matters more than swinging as hard as you can.
Once that part is in place, add speed little by little. Hit balls at 70%, 80%, 90%, and then full effort, while making sure your swing path and face angle stay stable.
Related Blog Posts
- Fixing Swing Path Problems: Common Mistakes
- Ultimate Guide to Fixing Over-the-Top Swings
- Top 5 Drills Using Alignment Sticks
- Ultimate Guide to Swing Path Optimization
