
Picking the right club for your approach shots can drastically improve your golf game. Did you know that approach shots account for 40% of the scoring advantage pros have over amateurs? Yet, most golfers consistently under-club, leaving shots short nearly 95% of the time on long approaches and 80% of the time with wedges. The good news? Better club selection doesn’t require changing your swing – just smarter decisions.
Here’s a quick summary of the 7 tips to improve your club selection:
- Know Your Distances: Measure your carry distance for each club, using tools like launch monitors or GPS devices, or calculate it manually.
- Evaluate Green Shape: Focus on aiming for the safest, widest part of the green to avoid hazards.
- Adjust for Wind: Factor in wind direction and speed, using more or less club as needed.
- Account for Elevation: Add or subtract clubs for uphill or downhill shots, and consider ground firmness.
- Check Your Lie: Analyze the ball’s position in the rough, sand, or uneven ground to choose the right club.
- Clear Hazards Safely: Always take an extra club to ensure you carry over bunkers or water.
- Consider Pin Location: Adjust your aim and club choice based on whether the pin is at the front, middle, or back of the green.
These strategies not only improve accuracy but also reduce errors caused by poor planning. By mastering these adjustments, you’ll hit more greens, avoid hazards, and lower your scores. Let’s break down each tip in detail.
Try this Club Selection Challenge – Why You Should Aim for Back of the Green
1. Know Your Exact Distance with Each Club
Understanding how far you actually hit each club is a game-changer. Many amateur golfers tend to overestimate their distances, which leads to mistakes – like missing the green 52.84% of the time from 125–150 yards if you’re shooting in the 90s. The key? Measure your carry distance, which is how far the ball travels in the air before landing.
As Luke Kerr-Dineen from Golf Digest explains:
"It doesn’t matter how far you hit your clubs. It matters that you know how far you hit your clubs".
To get precise numbers, consider booking a session with a launch monitor like Trackman or Foresight. These tools provide incredibly accurate carry distances. If that’s not an option, devices like the Rapsodo MLM2Pro (priced at $699), SkyTrak, or GPS watches such as the Garmin Approach S40 or Shot Scope V5 (around $250) can help you gather reliable data.
No tech? No problem. Use the median method: hit five shots with the same club, ignore the longest and shortest, and use the middle result as your yardage. On the course, you can also measure from your pitch mark to the pin and factor in any shortfall to calculate your carry distance.
Once you have accurate data, fine-tune your club setup. Make sure there’s a consistent 10–15 yard gap between your irons to avoid overlap. Even pros like Rory McIlroy tweak their clubs – he adjusted his pitching wedge loft by 1.5° to fix a distance gap. Knowing your numbers isn’t just helpful; it’s essential for better decision-making on the course.
2. Evaluate the Green’s Size and Shape
Before picking a club, take a good look at the green. Greens are rarely simple shapes. They might narrow at the front, widen at the back, or feature tricky corners and hazards that demand attention. Understanding these details can make a big difference in your approach. Pair your knowledge of your distances with the green’s layout to make smarter club choices.
Here’s an example: Imagine a 140-yard approach to a green that’s 40 yards deep but only 10 yards wide at the front, with a bunker and gully in play. Many golfers might instinctively grab an 8-iron. But opting for a 7- or 6-iron to aim for the 150–160 yard range could land your ball on the wider, 30-yard section of the green. This strategy not only increases your margin for error but also avoids those front hazards.
The key? Aim for the widest and safest part of the green. If the pin is tucked into a tight corner, it’s often best to ignore it. As GOLF Top 100 Teacher Kellie Stenzel advises:
"Unless you know your approach shot is going to be perfect, always favor the side of the green that is the most open, and will lead to a short game shot that has lots of green to work with".
Avoid short-siding yourself – missing the larger section of the green leaves little room for recovery. On tiered greens, focus on the level where the pin is located rather than the overall size of the green. By adjusting your club choice to match the green’s unique shape and layout, you’ll set yourself up for better results.
3. Adjust for Wind Direction and Speed
Wind can play a huge role in how far and where your ball travels. For instance, a 10 mph headwind can cut your mid-iron carry by 10–12 yards. If the wind picks up to 20 mph, you might lose over two clubs’ worth of distance – that could mean the difference between landing on the green or coming up short.
Trying to swing harder into a headwind? Bad idea. It increases backspin and can actually reduce your distance. A smarter approach is to take 1–2 extra clubs, swing at about 75–80% of your usual effort, move the ball slightly back in your stance (1–3 inches), and shorten your follow-through.
With a tailwind at your back, the ball will fly lower and roll out more. To adjust, subtract half the wind speed from your yardage. For example, a 150-yard shot with a 20 mph tailwind will play closer to 140 yards. Club down by one and be prepared for some extra rollout once the ball lands.
Crosswinds are trickier – they exaggerate sidespin, turning small fades into noticeable slices or gentle draws into hooks. To counter this, aim into the wind and let it carry the ball naturally. As golf instructor Nick Foy puts it:
"The wind acts like a second clubface – it alters the physics of your shot after the ball leaves the club".
Pay attention to the signs around you. Watch how trees sway or how the flagstick flutters, as wind conditions can vary between where you’re standing and the green. If you’re stuck between clubs on a windy day, go with the longer club and swing smoothly for better distance control.
Up next, we’ll dive into how elevation and ground conditions can impact your club choices even further.
4. Account for Elevation and Ground Firmness
Elevation plays a big role in how far your ball travels. A general rule of thumb is to adjust by one club for every 15 feet of elevation change. Daril Pacinella, Director of Instruction at Turtle Creek Country Club, puts it simply:
If there is an uphill or a downhill shot of 15 feet of elevation, add or subtract one club.
But elevation isn’t the only factor – ground firmness is just as important. Soft turf absorbs energy, limiting how far the ball rolls after landing. On the other hand, firm ground allows for extra roll, so you’ll need to factor that in when planning where the ball will stop. For instance, when hitting a downhill shot onto a firm green, the ball might roll much farther than expected. To avoid overshooting, consider using a more lofted club or a punch-style shot to keep the ball under control.

To make the best club selection, you’ll need to balance these elements. On an uphill shot with soft ground, you’ll want enough club to carry the ball all the way to your target since you can’t count on much roll. Conversely, a downhill shot on firm ground might require less club to prevent the ball from rolling too far past your target. Keep in mind that 80% of amateur golfers tend to leave their shots short, so if you’re unsure, it’s often better to use a little extra club. These adjustments, combined with factors like wind and lie, will refine your overall strategy for choosing the right club.
sbb-itb-bcd8bdd
5. Check Your Lie Before Choosing a Club
The condition of your ball’s lie plays a big role in deciding which club to use. On a clean fairway, you have plenty of options, but when the ball is in the rough, sand, or on uneven ground, your approach changes. Trent Wearner, a PGA Professional, puts it best:
The lie of the ball is a crucial determining factor for what club you can use effectively. A ball that is sitting down in the rough may require a club with more loft than what would get you to the hole, but forwarding it close to the green is better than not getting it out at all.
Taking the time to evaluate the lie is just as important as measuring distance – it shapes your entire club selection strategy.
A quick way to assess the rough is by using the "half-ball" rule. If more than half of the ball is visible, you can generally stick with your normal club for that distance. If less than half is visible, you’re dealing with a buried lie, and a high-lofted wedge is your best bet to get the ball out cleanly. Sarah Stone, a Top 100 Teacher, emphasizes this method:
If you can see more than half of your golf ball… you have the green light to hit the club you normally would… If the answer is no, you need to revisit your club selection… you’ll need to use one of your more lofted clubs.
Different lies also impact distance. A flyer lie, where the ball sits on top of the grass, can add 20–30 yards due to reduced backspin. On the other hand, a buried lie in thick rough can cost you 15–30 yards. In flyer situations, it’s smart to take one or two clubs less than the yardage suggests. For buried lies, you may need extra club or focus on simply getting the ball back to the fairway.
When it comes to fairway bunkers, clean contact is key. Sand can make the shot unstable, increasing the chance of hitting it fat. For example, a pitching wedge might lose 15–25 yards in the sand, while a 7-wood loses only 5–10 yards. Hybrids and fairway woods often perform better in these situations, gliding through the sand more effectively than mid-to-long irons. This gives you a better chance of making solid contact and advancing the ball.
6. Take Extra Club to Clear Hazards Safely
When water or bunkers guard the front of the green, many golfers instinctively grab a club based on their perfect strike distance. But here’s the reality: perfect strikes are rare. In fact, amateurs fall short of the pin on 95% of long approach shots and even miss their mark with a wedge 80% of the time. The solution? Go up a club. Using an extra club gives you a safety buffer, helping you clear hazards and land safely on the green – even if your shot isn’t flawless.
Short game expert Dave Pelz offers this advice:
The only time you should choose a club or make a swing that prevents you from passing the flag is when the flag is on the very back of the green.
Using more club not only creates a margin for error but also encourages a smoother, more controlled swing. When you push a club to its limits, you’re more likely to mishit – either fat or thin – which often leads to trouble.
There’s another bonus: greens tend to be wider at the back than at the front. Aiming for the back edge gives you a larger target area and helps you avoid hazards like front-side bunkers or water. If you miss long, you’re often left with a straightforward chip or putt. But if you come up short, you could end up in a hazard, costing you two or more strokes.
This approach is especially important in fairway bunkers. Kellie Stenzel, a Top 100 Teacher, stresses:
Clearing the lip is essential.
Sand contact can reduce your carry distance by 15–25 yards when using a pitching wedge. Taking an extra club ensures you advance the ball far enough, even if your contact isn’t perfect. Once you’ve cleared the hazard, you can fine-tune your club choice based on the pin’s position on the green.
7. Pick Your Club Based on Pin Location
When deciding on a club, don’t just think about distance and hazards – consider where the pin is positioned on the green. The pin’s location can significantly influence your approach. With the average green measuring about 30 yards deep and most clubs offering 10-yard gaps in distance, you might find yourself with three possible club options for the same spot in the fairway. Whether the pin is at the front, middle, or back of the green, each position calls for a slightly different strategy.
Front Pin
When the pin is near the front, aim for the center of the green. This strategy helps you avoid hazards guarding the front and accounts for the fact that most golfers tend to come up short. If you’re using a wedge, aim 10–15 feet past the hole to ensure you clear any obstacles. Keep in mind that the front section of most greens is narrow – around 10 yards – so precision is key here.
Middle Pin
For a pin in the middle of the green, choose a club that, with a perfect strike, would reach the back edge of the green. This approach gives you some margin for error, as even a mishit will likely leave you close to the hole. Targeting the middle also means you’re aiming at the widest part of the green, reducing the risk of leaving yourself with a tricky "short-sided" recovery.
Back Pin
A back pin requires careful consideration. Most greens slope from back to front, so missing long can leave you with a challenging recovery shot. Use a club that, with a solid strike, will reach the pin. Expect that a slight miss will land you safely in the middle of the green, rather than overshooting into trouble.
Always calculate the exact yardage to the flag to fine-tune your club selection. For example, if the middle of the green is 150 yards but the pin is at the back, opt for your 160-yard club. This small adjustment can save strokes and keep you out of trouble.
Club Selection Quick Reference Table
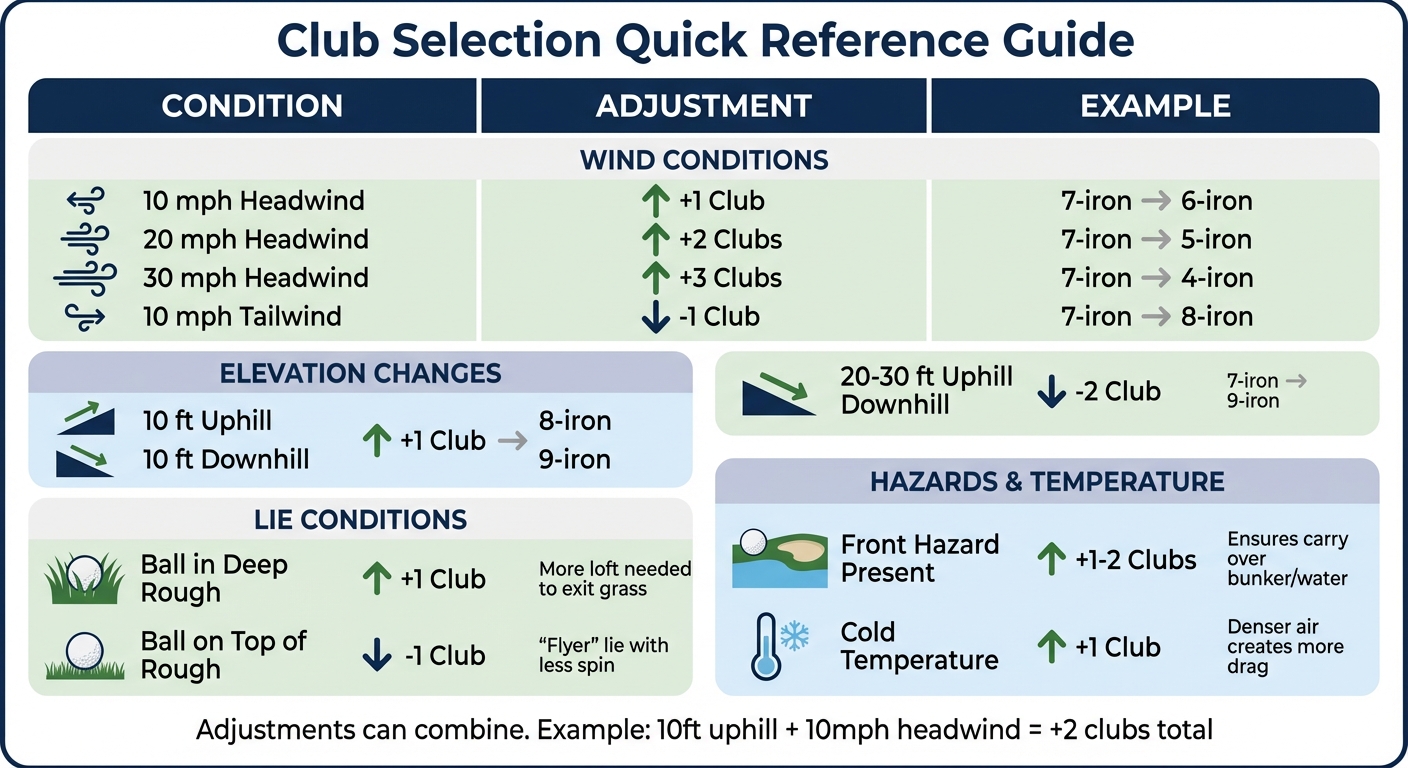
Golf Club Selection Adjustment Guide for Wind, Elevation and Course Conditions
Here’s a handy table to simplify your club choices when you’re out on the course. Instead of overthinking every approach shot, refer to this guide to quickly adjust your club selection for the most common conditions you’ll encounter:
| Condition | Adjustment | Example |
|---|---|---|
| 10 mph Headwind | Select one additional club | 7-iron becomes 6-iron |
| 20 mph Headwind | Select two additional clubs | 7-iron becomes 5-iron |
| 30 mph Headwind | Select three additional clubs | 7-iron becomes 4-iron |
| 10 mph Tailwind | Select one less club | 7-iron becomes 8-iron |
| 10 ft Uphill | Select one additional club | 8-iron becomes 7-iron |
| 10 ft Downhill | Select one less club | 8-iron becomes 9-iron |
| 20–30 ft Uphill | Select two additional clubs | 7-iron becomes 5-iron |
| 20–30 ft Downhill | Select two less clubs | 7-iron becomes 9-iron |
| Ball in Deep Rough | Select one additional club | More loft needed to exit grass |
| Ball on Top of Rough | Select one less club | "Flyer" lie with less spin |
| Front Hazard Present | Select 1–2 additional clubs | Ensures carry over bunker/water |
| Cold Temperature | Select one additional club | Denser air creates more drag |
This table highlights the key adjustments for various scenarios, making it easier to make confident decisions. As Mike McGetrick, PGA Teacher of the Year, puts it:
Take one more club (or one less) for each 10 mph of wind speed.
For instance, if you’re facing a 150-yard shot into a 30 mph headwind, you’d switch from a 7-iron to a 4-iron.

Keep in mind that adjustments can combine. For example, if you’re hitting 10 feet uphill into a 10 mph headwind, you’d need to select two additional clubs to account for both factors. Trust your adjusted choice and make a confident swing. This guide serves as a quick reminder of the principles covered earlier.
Conclusion
Hitting better approach shots boils down to mastering distance control and making smarter decisions on the course. When you know your carry distances, consider factors like wind, elevation, and your lie, you’ll set yourself up for success. Approach shots are a major factor in the scoring differences between Tour pros and everyday golfers at various skill levels.
One common mistake amateurs make is coming up short on 95% of long approach shots. This often happens because they choose clubs based on perfect strikes, without accounting for a margin of error. A simple fix? Take one extra club and make a smooth, controlled swing. This approach helps you land more shots pin-high and avoid those frustrating short misses that lead to tough recovery shots.
Another key is full commitment to every shot. Once you’ve assessed the distance, wind, lie, and chosen your club, trust your swing. Hesitation often leads to mistakes, and confidence can make all the difference. These elements together create a reliable framework for every approach shot.
Use these seven tips as a mental checklist: start with the distance, factor in the conditions, and select the club that increases your chances of hitting the green – even if your contact isn’t perfect.
For more drills and techniques to sharpen your distance control, check out How To Break 80. Resources like the Distance Control Drill can help you refine your skills and handle those tricky "tweener" yardages.
FAQs
How can I measure my carry distance without using expensive equipment?
To figure out your carry distance without fancy gadgets, all you need is a flat, open space – like a driving range – and a bit of patience. Start by marking a specific distance, say 100 yards, using a tape measure or a measuring wheel. Place a visible marker at that spot so you can easily track your shots.
Next, grab a club and hit several balls, paying close attention to where they land in relation to your marker. For each shot, measure the distance from where you teed off to the landing spot. Once you’ve collected your data, calculate the average distance of all your shots. This average will give you a reliable carry distance for that particular club.
To keep things organized, jot down these distances in a notebook or a spreadsheet. As your swing changes over time, you can update your records to ensure they stay accurate. This straightforward method saves money and takes the guesswork out of choosing the right club when you’re out on the course.
What are the best tips for handling crosswinds on approach shots?
When dealing with crosswinds on approach shots, adjust your aim slightly into the wind to counteract the ball’s drift. To add stability, consider hitting a lower-trajectory shot – commonly known as a "knock-down" shot – by decreasing loft and spin. Use a club that promotes a controlled, compact ball flight, which helps reduce the effect of side-spin from the wind. These small tweaks can make a big difference in keeping your shots on target, even when conditions are tough.
How should elevation changes influence my club selection for approach shots?
Elevation changes play a big role in determining your approach shot distance. When you’re hitting uphill, the ball doesn’t travel as far because of the incline. To compensate, you’ll usually need to club up – adding one club for every 15 feet of elevation gain is a good rule of thumb. On the flip side, downhill shots allow the ball to carry farther. In these cases, you’ll want to club down, typically dropping one club for every 15 feet of elevation drop.
Making these adjustments for elevation helps you manage distance more effectively and improves your chances of landing closer to the pin. Pay attention to the slope and practice these tweaks to feel more confident in your club choices.
Related Blog Posts
- How To Pick the Right Shot Around the Green
- Ultimate Guide to Shot Shaping on Uneven Lies
- How To Plan Approach Shot Trajectory
- Ultimate Guide to Approach Shot Club Selection
