
I plan for the lowest score – not the longest shot. Before a tournament, I use my average carry distances to choose safe targets and flag the 3 holes where my usual miss could lead to a penalty or double bogey.
My approach follows these golf tips and 10 choices:
- Plan each hole: Write a main plan and a safer fallback.
- Compare tee clubs: Pick the club whose misses stay in play.
- Choose a tee target: Allow room for my normal shot shape.
- Choose an approach target: Clear trouble and leave room to stop.
- Assess par 5s: Attack only when contact, carry, and landing space support it.
- Weigh short par 4s: Compare the shorter approach with the risk of a penalty.
- Limit recovery damage: Accept bogey rather than force a low-odds shot.
- Account for conditions: Adjust for wind, cold, wet lies, and firm ground.
- Keep one routine: Decide behind the ball, then commit.
- Review my choices: Look for patterns across at least 10 rounds, separating poor decisions from poor swings.
I also check the tournament format and local rules before playing. The goal? <u>Give every shot a clear job</u> – and keep one bad swing from becoming a big number.
How I Build My Golf Tournament Strategy | Course Management
sbb-itb-bcd8bdd
Know Your Game and the Tournament Rules
Use a launch monitor session to measure each club’s average carry – not just your best swings. Keep carry and roll separate, and track 10 rounds to learn your miss pattern. With one primary wedge, record carry distances for half, three-quarter, and full swings. Mark one pressure swing, and note how wind and cold affect carry.
In stroke play, weigh each risk against its effect on your total score. On long putts, focus on speed control and aim to leave the ball inside 3 feet.
In match play, adjust your risk based on your opponent’s position. In four-ball, let your partner’s safe position guide when you attack.
Check the format, tees, and local rules before you arrive. Confirm whether distance-measuring devices are allowed under the USGA Rules of Golf. If your rangefinder calculates slope, turn that feature off for tournament play. Choose your club using your carry card, not the pin yardage. Once you know your numbers and the rules, plan each hole before tournament day.
1. Plan Each Hole Before Tournament Day
Use your carry numbers to map out each hole before you tee off.
Start at the green and work backward. Use the course map, scorecard, and yardage book to pick the safest side of the green as part of your golf strategy. Then use your preferred approach yardage to choose a tee-shot landing zone. Plan to avoid big scores, not squeeze out extra distance. Take the safer route, even if it leaves a longer wedge shot. During practice rounds, check the hazards and recovery shots your plan accounts for.
Use a rangefinder or GPS to verify the carry distances needed to clear trouble. Mark penalty areas, bailout zones, run-offs, and short-sided misses. Know where a miss costs one shot – and where it costs two. Note the green’s slopes and favor uphill putts, but don’t force a risky approach to get one.
Write a primary plan and a safe fallback for every hole. For each option, record your tee-shot club, landing area, approach yardage, safest side of the green, and bailout. Identify the miss you need to avoid. Once you’ve written your plan, commit to it on the tee.
2. Match Your Tee Club to Carry and Dispersion
Once you’ve planned the hole, pick the club that fits your mapped landing area. A shorter club isn’t automatically safer. Choose the club whose misses stay playable, which is a key strategy to quickly improve your golf game.
Compare tee clubs using your carry distances and miss patterns – not just your best shots. Each club’s full landing pattern needs to fit the space available.
| Tee-shot situation | Suitable club category | Benefit | Risk |
|---|---|---|---|
| Wide landing area, long hole | Driver | Shorter next shot | Wide misses reach trouble |
| Trouble within driver’s landing or rollout range | Fairway wood or hybrid | Keeps trouble out of reach | Longer approach |
| Narrow corridor with trees or OB | Hybrid or iron | Fewer recovery shots | Harder second shot |
| Forced carry | Driver or fairway wood, if carry clears the hazard | Clears trouble | Mishits may fall short |
For forced carries, rely on your measured carry distances and leave room for error. Choose the longest club whose misses avoid trouble while leaving a playable second shot.
With your tee club chosen, the next decision is your exact target.
3. Pick Your Tee-Shot Target Before Your Club
Aim for the widest safe landing area – not automatically the fairway center. Find the broadest part of the hole where a miss still leaves you in a safe spot. A little extra distance isn’t worth a narrow landing area that brings water, OB, or a poor approach angle into play.
Your landing target and start line aren’t the same thing. Choose a start line that lets your normal shot shape move toward the target, while leaving room for a straight shot or slight miss to finish safely. Stick with one reliable shape for the round rather than trying to curve the ball both ways under pressure. Pick the target first, then confirm your club.
Your position on the tee can help improve that angle.
If trouble is left, use the left side of the tee box to open the safer angle.
Use the full legal teeing area: your ball must stay within the area between the tee markers, extending two club-lengths behind them. Use that width and depth to find your best angle. Choose your tee-shot target with the next approach target in mind.
4. Choose Approach Targets for the Pin and Green
After the tee shot, focus on the safest route into the green. Use the pin to judge risk, but aim at the safest side of the green. Pick a target where a miss still leaves a routine chance at par.

Then choose the carry distance needed to reach that area. Select your club based on carry to the front edge, not the flag. Measure the carry needed to clear front trouble, then account for rollout based on your lie and the green’s firmness. Give the ball enough room to stop. Use back-edge yardage to guide club selection – not as your target.
Before committing, decide where you’d rather miss. Favor flat ground or an upslope that leaves the easiest next shot.
5. Decide When to Attack or Lay Up on Par 5s
Make your par 5 plan before you tee off. Go for the green in two only if your dependable carry – not your longest shot – clears the trouble and sets up a second shot you can trust. Otherwise, plan to reach it in three. Your drive matters only if it leaves you a workable next shot.
After the drive, assess the shot you have, not the one you wanted. Start with your planned carry numbers, then account for your lie, stance, slope, and wind. Check three things: clean contact, enough carry to clear the trouble, and a landing area with room for the ball to stop. If all three checks pass, go for it. If not, lay up.
Bail out when needed. If your drive leaves you blocked or unable to advance safely, pitch out rather than force a shot toward the green.
When you lay up, get as close as you safely can to protect par and score lower. Choose the wedge yardage that gives you the best shot rather than chasing a favorite number. Aim for a wide target that opens up your third shot to the green. Wind and firm ground can change that plan fast.
6. Weigh the Risk of Driving Short Par 4s
Short par 4s call for the same risk-reward thinking. The safest tee club keeps trouble out of play and sets up the best next shot.
Compare driver with a layback using your carry distances and shot dispersion for each tee club. Then factor in the lie, pin position, and bailout area to choose your play.
| Strategy | Favorable conditions | Scoring opportunity | Main risk |
|---|---|---|---|
| Drive the green | Wide entry; no hazards in front; center or back pin | High: eagle or birdie chance | Penalty or short-sided recovery |
| Lay back | Narrow fairway at driver distance; tucked pin; layup leaves a full wedge | Moderate: birdie or par chance | Longer approach or long putt |
| Aggressive layup | Large bailout area near the green; favorable wind | Moderate to high: birdie chance | Tough chip or poor lie |
Match your usual miss to the pin and hazards. Depending on where it lands, a miss near a tucked pin could leave a simple chip or a tough bunker shot. Aim for the widest target rather than a flag tucked behind trouble. Laying back helps only when it leaves an easier approach than the recovery shots you’re trying to avoid. In stroke play, steer clear of the miss that turns a bogey into a double. For more situational advice, explore our specific golf questions archive.
Shorter approaches often improve birdie chances – but only when the extra distance off the tee doesn’t add penalty risk. Attack only when the shorter approach clearly improves your odds.
7. Choose Recovery Shots That Limit Damage
When an aggressive play fails, switch to damage control. Accept bogey if saving par means attempting a shot you can’t reliably execute. Choose a recovery that leaves a routine next shot rather than risking double bogey. Take a moment to reset before you swing.
Under trees, aim for the safest escape route. Punch toward a wide, flat bailout area that gets you back in play in one swing. Check the entire path, including any second tree between you and the green.
In deep rough, check the lie and slope before picking a target. Favor a shot that gets you back in play in one swing. If solid contact looks doubtful, use a shorter, controlled swing. Inside 30 yards, aim toward the center rather than a tucked pin to avoid short-siding yourself.
In bunkers, focus on getting out in one shot, even if that leaves a long putt. Check for trouble beyond your landing area, especially water behind the green.
Recovery and relief are separate decisions. If taking relief is your damage-control option, follow the correct procedure and apply the right penalty. Lost or out-of-bounds balls normally require stroke and distance – not ordinary penalty-area relief.
8. Adjust for Wind and Course Conditions
Once you’ve chosen the safe play, factor in the day’s conditions. Read the wind along the entire shot path, not just at the tee. Use your practice rounds and golf lessons to learn how exposed holes play.
Into a headwind, take one more club and swing smoothly. In a crosswind, aim far enough from trouble to protect both your carry and landing area.
Cold air cuts carry distance, so club up. From wet or thick rough, choose the shot that gets you back in play.
On firm fairways, allow for extra rollout. Adjust your landing spots and leave more space between your target and penalty areas so your usual miss stays playable. On fast greens, favor a softer, die-it-in pace. Commit to the adjusted plan and use the same pre-shot process every time.
9. Follow the Same Pre-Shot Routine
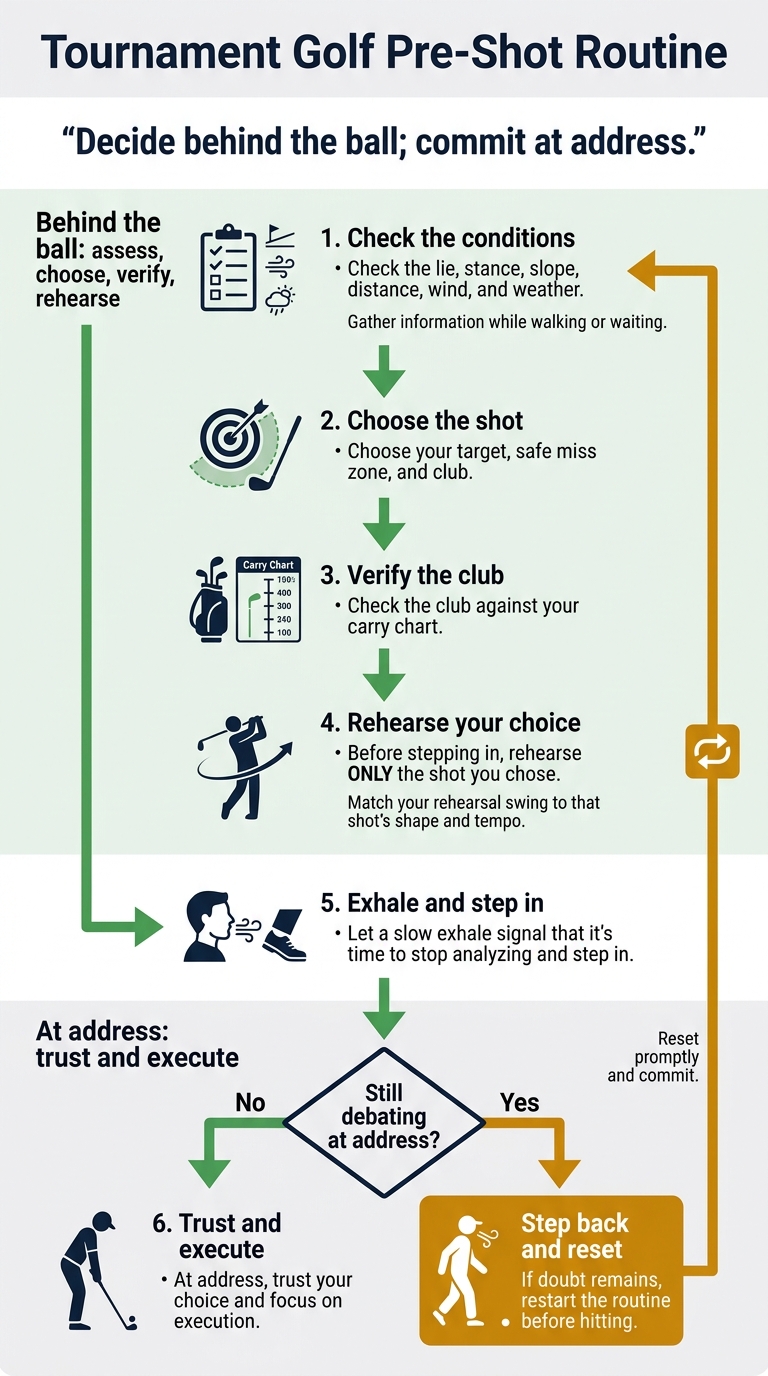
Tournament Golf Pre-Shot Routine
Once you’ve chosen the target and club, follow the same swing routine every time. Check the lie, stance, slope, distance, wind, and weather before choosing your target, safe miss zone, and club. Then check the club against your carry chart. Decide behind the ball; commit at address. Your routine helps keep second-guessing out of the swing.

Before stepping in, rehearse ONLY the shot you chose. Match your rehearsal swing to that shot’s shape and tempo. Let a slow exhale signal that it’s time to stop analyzing and step in. At address, trust your choice and focus on execution.
Still debating at address? Step back and reset. Gather information while walking or waiting so you can reset promptly and commit. If doubt remains, restart the routine before hitting.
10. Review Your Decisions After Each Round
After each round, review the choices behind your score. Track more than the total: doubles or worse, greens in regulation, three-putts, up-and-downs, and penalty strokes. Label costly tee misses as No Shot (blocked or punch-out), Penalty, or Lost/OB. Note risky attacks and failed recoveries, including whether you forced the shot or played safe. For approach misses, record short, long, left, or right.
Separate the decision from the swing. Compare each costly shot with your pre-round plan and the target and club you chose before hitting. Was the problem your choice, your swing, or both? A good result doesn’t make a risky choice sound, and a mishit doesn’t automatically mean you chose poorly. Label each costly shot as a decision error, execution error, or both.
Look for patterns across at least 10 rounds – not just one bad day. Let those patterns, rather than a single score, shape your next tournament plan. Before the next tournament, update targets that leave you short-sided, adjust club choices linked to repeated short misses, and replace high-risk recovery choices. Use decision errors to revise your plan and contact errors to guide practice.
Conclusion: Plan, Choose Targets, and Review
Base your tournament plan on your stock carry, preferred approach yardage, and safest miss. Choose targets away from water, OB, and short-sided trouble.
Before your next tournament, flag the three holes most likely to produce doubles or lost balls. If you don’t have course history, focus on holes where your usual big miss puts penalty trouble or OB in play.
For each hole, write down a primary plan and a safer fallback. Include the club, target, and trouble to avoid, plus what would prompt a switch: wind, lie, or slope.
On tournament day, adjust to the conditions – not the pressure to force a score. Check the conditions, commit to your shot, and take the safer option when needed. Accept bogey instead of forcing a recovery that could lead to double or triple. Review the round, update your plan, and take those changes into your next tournament.
FAQs
How can I plan for a course I’ve never played?
Plan each hole from the green back to the tee. Choose your approach club first, then work out the ideal tee shot to set it up. Before you arrive, use digital tools or course maps to study hazards, doglegs, and green layouts.
On the course, aim for the widest part of the green and pick bailout areas that leave you room to recover. This helps you avoid short-siding yourself – missing where there’s little green between your ball and the hole. If you’re unsure how far away a hazard is, check a reliable range-finding tool.
How much safety margin should I allow for forced carries?
Use your actual carry distance – not total distance – and take one extra club for a safety margin. Know how far you carry each iron. Course conditions and adrenaline can leave shots shorter than you expect.
If a forced carry is beyond your reliable range, aim for a safe bailout area or a broader stretch of fairway to avoid costly penalties.
When should I change my strategy if I’m trailing?
Don’t change your game plan just because you’re trailing. Stay disciplined and avoid double bogeys or worse. When you’re in trouble, aim for a bogey instead of trying to save par with a risky shot that could cost you more strokes.
Keep aiming for the middle of the green and steering clear of hazards to protect your score and stay in contention.
Related Blog Posts
- How To Pick the Right Shot Around the Green
- Ultimate Guide To Penalty-Free Golf
- Scoring Trends on Par 3s, 4s, and 5s
- Lay-Up vs. Go For It: When to Choose
