Shortening your driver shaft can improve your accuracy and control, especially if your current shaft feels too long for your swing. This DIY process involves cutting the shaft, smoothing the edges, and reassembling the club. Here’s a quick summary:
- Why shorten the shaft? It helps with straighter shots and better control, though it may slightly reduce distance. Many pros use shorter shafts for improved consistency.
- What you need: A hacksaw or rotary tool, sandpaper, grip tape, epoxy, and safety gear like gloves and glasses.
- Steps to follow:
- Measure and mark the shaft where you want to cut.
- Secure the shaft in a vise and cut carefully.
- Smooth the edges, reattach the grip, and adjust weights if needed.
- Mistakes to avoid: Never cut the tip, use improper tools, or overlook swing weight changes.
Shortening your driver shaft is permanent, so measure carefully and test thoroughly at the range. With the right tools and attention to detail, you can refine your club for better performance.
Why and How Driver Shaft Shortening Works
Reasons to Shorten a Driver Shaft
Shortening a driver shaft can be a game-changer for golfers looking to improve accuracy and control. When you hit the center of the clubface more consistently, your drives are straighter, making it easier to stay on the fairway. This added control can also help reduce slices, a common problem that leads to wayward shots.
Better control often translates to greater confidence on the course, which can elevate your overall performance. Interestingly, about 90% of average golfers use shafts that aren’t ideal for them. Off-the-rack drivers are typically around 45¾″ to 46″ in length, but many tour professionals prefer shorter shafts, usually between 44 and 44.5 inches.
How It Changes Club Performance
When you shorten your driver shaft, it alters the swing dynamics in noticeable ways. For every ½″ removed, the swing weight decreases by 3 points. While this adjustment might slightly reduce clubhead speed, the improved ability to make solid contact often results in more consistent and accurate shots.
What You Give Up
Shortening the shaft does come with a trade-off: a potential loss in maximum driving distance due to a slight drop in clubhead speed. However, for most golfers, the benefits of better contact and control far outweigh the distance sacrifice. Even tour pros, like Rory McIlroy, have made similar adjustments to fine-tune their game. The ultimate goal is better ball striking and lower scores – not just raw distance.
Next, you’ll need the right tools to make these modifications.
How to CUT DOWN (shorten) your own golf clubs AT HOME
Tools and Materials You’ll Need
Having the right tools can mean the difference between a smooth shaft modification and an expensive mistake. The good news? Most of these items are easy to find at your local hardware store or golf shop.
Required Tools
Start with a golf-specific vise to hold the shaft securely without causing damage – especially important for graphite clubs. A good-quality vise will run you about $30–$60.
For cutting, use a standard hacksaw for steel shafts or a fine-toothed blade for graphite. These typically cost between $20–$100.
You’ll also need a measuring tape, a marker, and some masking tape to ensure accurate measurements and to protect the shaft during cutting. To replace the grip, grab a roll of grip tape ($5–$10), a bottle of golf solvent ($5–$15), and a replacement grip ($5–$20). A small piece of sandpaper will come in handy for smoothing out the cut edge.
Once you’ve gathered your tools, don’t overlook safety.
Safety Gear
Protect yourself with safety glasses and gloves, both of which cost less than $10 each. These will shield you from sharp splinters and metal filings during the process.
If you want to take your modifications to the next level, a few optional tools can help fine-tune your adjustments.
Optional Tools for Fine-Tuning
For more precise modifications, consider adding lead tape ($5–$10 per roll) and a swing weight scale ($30–$100) to your toolkit. If you’re assembling clubs, epoxy and a chop saw ($50–$200) can improve precision and ease of use.
Altogether, the basic tools will cost you roughly $80–$150. It’s a worthwhile investment if you plan to modify multiple clubs or help other golfers fine-tune their equipment.
How to Shorten Your Driver Shaft
If you’re ready to modify your driver shaft at home, precision is key. Follow these steps carefully – once you make a cut, there’s no going back.
Measure and Mark Where to Cut
Start by measuring your driver’s current length. Stand the club vertically with the clubhead resting on the ground. Use a measuring tape to check the length from the ground to the top of the grip.
Another method is to measure from the grip end down the back of the shaft to where the ground would meet the club in an address position. If you use this approach, subtract 1/8 inch to account for the grip cap.
Once you’ve determined how much to shorten the shaft, mark your cutting point. Always trim from the butt (grip) end of the shaft, not the tip. Use a Sharpie to clearly mark the spot, and double-check your measurements. It’s better to measure multiple times before making an irreversible cut.

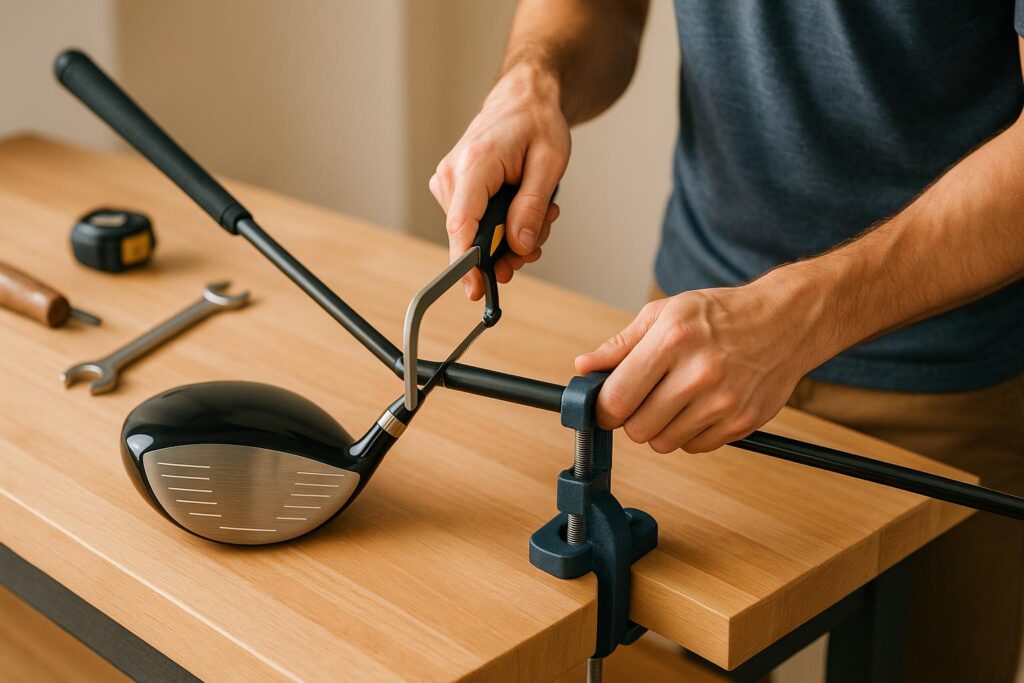
Secure and Cut the Shaft
Before cutting, put on safety glasses and gloves. Work in a well-ventilated area – preferably outdoors – to avoid inhaling graphite dust.
Secure the shaft in a golf-specific vise, ensuring it’s held firmly without damaging it. Rubber pads or wood blocks can help protect the shaft’s surface. Wrap masking tape around the marked cutting point to prevent the carbon fibers from splintering during the cut.
For the cleanest results, use a high-speed rotary tool (like a Dremel) with a fiberglass-reinforced abrasive cutoff wheel designed for hard materials. Avoid using metal cutting wheels, as they aren’t suitable for graphite shafts.
"Do not try to cut graphite with hand saws or hacksaws. These tools will fray the carbon fibers. They will make a messy, unsafe cut." – Grove Park Golf
Set your rotary tool to high speed, as faster speeds reduce friction and heat, which minimizes splintering. Apply light, steady pressure, letting the tool do the work. Rotate the shaft or move the tool evenly around it to ensure a clean cut.
If you’re using a fine-tooth hacksaw instead, work slowly and carefully to avoid fraying. However, a rotary tool is generally the better choice for precision.
Finish and Reassemble the Club
After cutting, remove the masking tape and check the cut edge. Smooth it with 220-grit (or finer) sandpaper using gentle, circular motions.
Clean up any graphite dust immediately with a damp cloth or a vacuum equipped with a HEPA filter. Avoid sweeping, as this can spread harmful particles into the air.
Next, reinstall the grip. Apply a layer of grip tape to the shaft, leaving about 1/8 inch extending beyond the cut end. Add golf solvent inside the new grip and coat the interior thoroughly.
Slide the grip onto the shaft, ensuring proper alignment. If it feels tight, apply more solvent. Once the grip is in place, let it sit for 2–4 hours to fully set before using the club.
With the club reassembled, test it out to see how the shortened shaft affects its balance and feel. This change will alter the swing weight and overall performance, so spend some time at the driving range to fine-tune and get comfortable with the new setup.
sbb-itb-bcd8bdd
Mistakes to Avoid
Before testing your modified driver, it’s crucial to steer clear of certain mistakes that could harm your club’s performance. A few missteps can turn a simple shaft-shortening project into a costly disaster, potentially damaging your driver or creating performance issues.
Cutting the Wrong End
Never cut the tip of the shaft. Trimming from the tip changes the shaft’s flex, which directly affects ball flight. The tip section is designed to control how the shaft bends during your swing. If you cut it, the shaft stiffens, reducing its ability to bend and resulting in less distance and poor ball flight.
Instead, always trim from the butt end – the grip side – of the shaft. This method maintains the shaft’s original flex and performance characteristics while achieving the desired length adjustment.
Poor Cuts and Splintering
Graphite shafts are made from layers of carbon fiber, which can easily fray or splinter if not cut correctly. A rough or uneven cut doesn’t just look bad; it can weaken the shaft and create sharp edges that might damage your grip over time.
Avoid using tools like hand saws or hacksaws with coarse teeth, as they can tear the carbon fibers instead of cutting them cleanly. Instead, use cutting tools designed specifically for composite materials.
To prevent splintering, wrap at least two layers of masking tape on either side of your cutting line. This helps hold the fibers in place for a cleaner cut. If you’re using a rotary tool, follow the previously described high-speed cutting method for the best results. After cutting, smooth the edges with fine-grit sandpaper (220-grit or higher) to ensure a clean finish and proper grip installation.
Ignoring Swing Weight Changes
Shortening the shaft changes the club’s swing weight, often making it feel lighter during your swing. While a lighter swing weight might increase swing speed, it can also disrupt your control and timing at impact.
Test the club after shortening to evaluate the new swing weight. If the club feels too light, you can add weight to the clubhead using lead tape. Start with small amounts and test your swing until you find the right balance.
For a more precise adjustment, consider having the swing weight professionally measured at a golf shop. Then, head back to the range to fine-tune your adjustments based on how the club feels during play.
Testing Your Modified Driver
Now that you’ve made changes to your driver, it’s time to see how those modifications impact its balance and performance. A shorter shaft will feel different in your hands, and its behavior during your swing is likely to change.

Check Balance and Swing Weight
One of the first things you’ll notice is that the club feels lighter. This happens because reducing the shaft length lowers the swing weight – each ½" you remove decreases the swing weight by about 3 points, which is noticeable for most golfers. While this lighter feel might seem like an improvement at first, it can throw off your timing and control.
Before hitting any balls, take a few practice swings with the modified driver. Focus on how the clubhead feels during your swing. If it feels too light, you’ll need to add weight to bring back the balance.
Adding weight is simple. You can use lead tape or tungsten self-adhesive weights to adjust the clubhead. Start small – apply a little weight to the back of the clubhead and test again. For drivers with adjustable weights, increase the existing weight by about 5 grams to compensate for the shorter shaft. If your driver has removable weight screws, you’re in luck – just swap out the current weight for a heavier one to fine-tune the balance. Once you’ve made these adjustments, it’s time to hit the range.
Test It at the Driving Range
The driving range is where you’ll see how the changes affect your ball flight and impact. Start by hitting several shots with your usual swing. Pay close attention to your ball flight. If you notice the ball consistently pulling left (for right-handed players), your clubhead might be too light. On the other hand, if your shots are pushing right, the head could be too heavy.
After each session, check the impact marks on the clubface. If you’re consistently striking the ball lower on the face, it might mean the shaft is now too short for your swing setup.
Jeff Summitt from Hireko Golf offers this practical advice for range testing:
"You may not have to adjust the head weight at all. I would hit balls at the range and watch ball flight. If the ball is relatively straight, I would leave well enough alone. You could take some lead tape with you and add incremental amounts of weight to the back flange of the driver to see if it makes any difference."
Monitor Results and Make Changes
After testing your modified driver, take some time to review your results. It’s a good idea to spread this testing over several sessions, as your initial swings might not reflect how the club performs once you’ve adjusted to the changes.
If your ball flight remains erratic even after adding weight, you may have shortened the shaft too much. In that case, you might need to extend the shaft or replace it with a new one to restore a better length.
Keep track of your observations – note carry distance, accuracy, and how the driver feels at different swing speeds. Make small adjustments to the weight until you find the sweet spot where the shorter shaft gives you better control without sacrificing distance or accuracy. The goal is to strike a balance that works for your swing and playing style.
Conclusion
Wrapping up your DIY driver shaft modification, trimming a driver shaft at home can be a straightforward project that helps improve your control and accuracy on the course. Success hinges on careful preparation, precise execution, and thorough testing of the modified club.
Start by gathering the right tools and safety gear. Take your time with measurements and markings – once the shaft is cut, there’s no going back. Remember, shortening the shaft may alter the club’s balance, so you might need to tweak the clubhead weight to maintain proper equilibrium.
Make the cut with precision – any uneven or rough edges could compromise the shaft’s integrity. Once the modification is complete, head to the range to test the driver. Adjust as needed until the balance and performance feel just right. Use the feedback from your practice sessions to fine-tune the setup for optimal results.
Always prioritize safety. Wear protective eyewear, work in a well-ventilated space, and don’t hesitate to consult a professional if you’re unsure about any step in the process.
A properly shortened driver can enhance your control and consistency, even if it means sacrificing a bit of distance. With attention to detail and thorough testing, you can tailor your club to fit your swing and help bring down your scores.
For more tips and practical guides to refine your game, check out How To Break 80.
FAQs
What risks should I be aware of when shortening a driver shaft at home, and how can I prevent them?
Shortening a driver shaft at home can be tricky and comes with a few risks if not handled properly. For starters, cutting the shaft might make it stiffer, which can affect the club’s flexibility and how it performs overall. On top of that, using the wrong technique could damage the shaft, mess up the club’s balance, or even lead to injuries while playing.
To minimize these risks, it’s important to have the right tools. Use a clamp or vise to hold the shaft securely, and opt for a fine-tooth saw or a cutting tool specifically made for golf shafts. Take precise measurements before making any cuts to avoid mistakes. If you’re not confident in your skills, it’s a smart move to consult a professional or take the club to a certified shop for the adjustment. These steps can help keep your club safe and performing as it should.
How can I figure out the right amount to shorten my driver shaft for better performance?
To figure out the best length to shorten your driver shaft, start by assessing your swing and how you’re striking the ball. A quick way to test this is by gripping lower on the handle and noting where the ball hits the clubface – striking the center is what you’re aiming for. Another helpful factor is your wrist-to-floor measurement, as most amateur golfers typically use shafts that measure between 43.5 and 44.5 inches.
Try out different shaft lengths, paying close attention to your control and how cleanly you’re hitting the ball. Making small, gradual changes will help you zero in on the ideal length for your swing, boosting your overall game.
What can I do if my shortened driver feels too light or throws off my swing?
If your shortened driver feels off – maybe too light or unsteady – it might be time to tweak its weight or even explore a shaft replacement. Adding weight to the clubhead or grip can help restore balance, giving you better control and a more comfortable feel. On the other hand, swapping out the shaft for one that matches your swing speed and style in both weight and flex can have a noticeable impact on your performance.

For a tailored solution, it’s a smart move to consult a professional club fitter. They can analyze your swing and suggest adjustments that boost both control and consistency, ensuring your driver complements your game rather than holding you back.
Related posts
- 5 Essential Driver Setup Tips for Longer, Straighter Shots
- How to Measure Golf Club Length
- Junior Driver Length Chart by Age
