
The follow-through in a golf swing is more than just a finishing pose – it reflects the quality of your swing mechanics. A balanced, high finish indicates smooth rotation, proper weight transfer, and controlled club motion. Neglecting this phase can lead to inconsistent shots, loss of power, and poor accuracy. Here’s what you need to know:
- Why It Matters: The follow-through ensures momentum, balance, and consistency. Professional golfers generate more distance due to efficient mechanics, averaging 2.61 yards per mph of clubhead speed compared to amateurs’ 2.29 yards.
- Key Components: A proper follow-through includes:
- 80-90% weight on the lead foot.
- Full hip and chest rotation toward the target.
- Arms extending fully with hands finishing above the lead shoulder.
- Club wrapping around the body, resting over the lead shoulder.
- Common Faults: Issues like "chicken winging", poor weight transfer, or deceleration can disrupt your swing. These are often signs of earlier swing flaws.
- Drills for Improvement: Practice drills like the Step-Through Drill or Lead-Side Balance Drill to improve rotation, weight shift, and balance. Use video analysis or impact bags for feedback.
Mastering your follow-through isn’t just about aesthetics – it’s about improving your swing’s efficiency and consistency. Commit to focused practice, hold your finish, and work on drills to see long-term results.
Finish the Golf Swing Like This | How to Follow Through
Key Components of a Proper Follow-Through
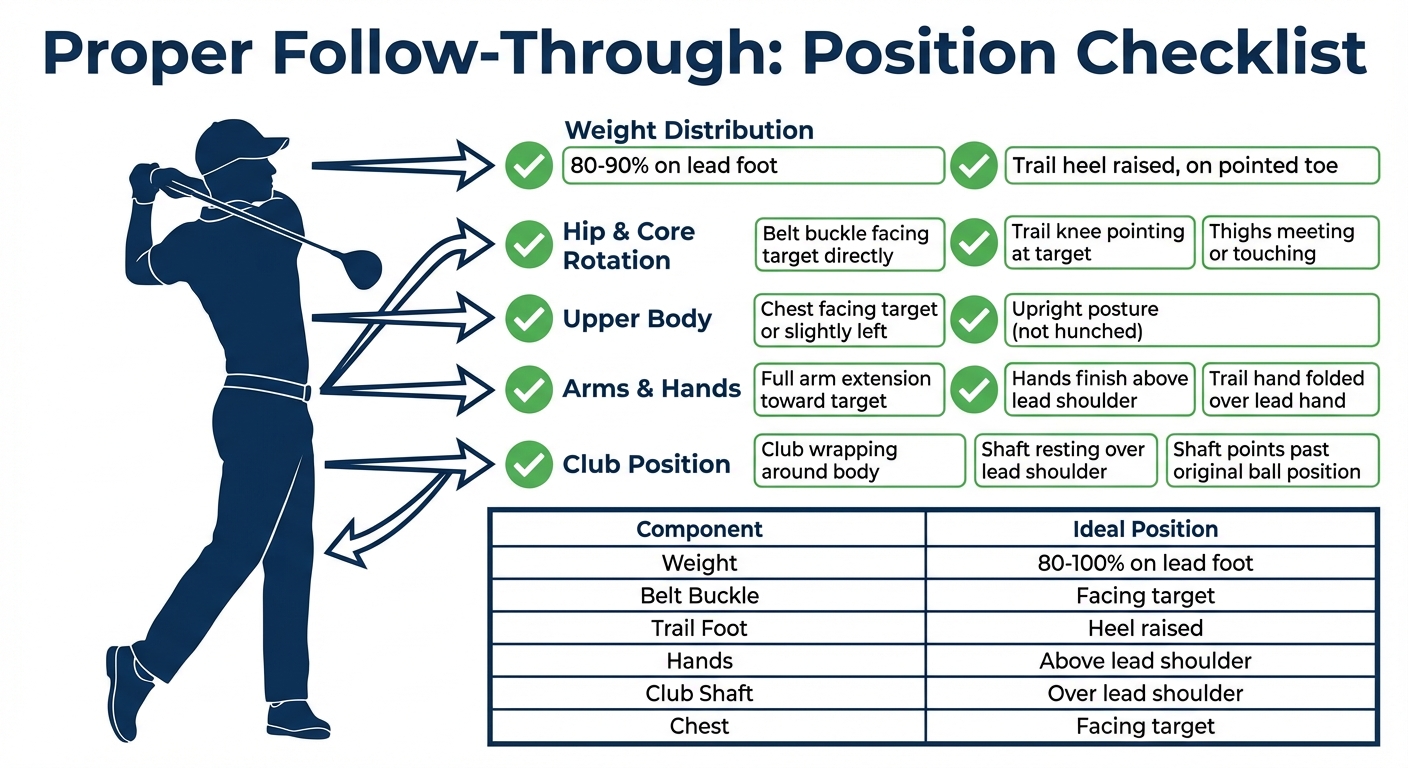
Proper Golf Follow-Through Position Checklist
A solid follow-through relies on three interconnected elements: body rotation, arm extension, and club positioning. Together, they create a balanced and powerful finish that reflects the quality of your entire swing.
Body Position and Rotation
The way your body moves and balances during your follow-through reveals a lot about your swing. By the time you finish, 80% to 90% of your weight should shift to your lead foot. Some instructors even suggest transferring your full body weight. Your trail foot should remain on its tiptoes with the heel raised, serving mainly as a stabilizer. Pay attention to your belt buckle and trail knee (for right-handed golfers) – they should point directly at the target, signaling full hip rotation.
Your chest and shoulders should also rotate to face the target or slightly left of it. To avoid a hunched position, aim for an upright finish. If your thighs meet or touch at the end, it’s a good sign you’ve achieved proper hip turn.
"A smooth, balanced, and controlled follow-through creates more consistent and repeatable flush contact for much better golf." – ScramblingTom, Writer, Golf Leap
Arm and Wrist Motion
After impact, focus on fully extending your arms toward the target. This extension keeps your swing wide and helps prevent the dreaded "chicken wing" mistake, where the lead elbow bends upward, opening the clubface and leading to slices.
Keep your lead wrist flat or slightly flexed at impact, then let it extend naturally during the follow-through. At the same time, your trail wrist should rotate, with the trail hand folding over the lead hand. Ideally, your hands should finish above your lead shoulder.
"If your thighs aren’t meeting [at the finish], you’ve likely been swinging the club with your hands instead of the hips and upper body." – ScramblingTom, Golf Writer
Be cautious of premature body rotation, which can force your hands into a "flippy" finish, reducing ball compression and control.
Club Path and Finish Position
The path your club takes after impact says a lot about your mechanics. For right-handed golfers, the club should naturally exit to the left as your body rotates, rather than continuing straight down the target line. If the club stays too far right, it’s often a sign of a blocked shot or an early flip at impact.
A proper follow-through sees the club wrapping around your body, resting over your lead shoulder and behind your head. Maintaining clubhead speed through impact helps you achieve a high finish, and if the shaft points past your original ball position, it confirms you’ve completed a full arc.
| Component | Ideal Position |
|---|---|
| Weight Distribution | 80% to 100% on lead foot |
| Belt Buckle | Facing target directly |
| Trail Foot | Heel raised, on pointed toe |
| Hands | Above lead shoulder |
| Club Shaft | Over lead shoulder |
| Chest | Facing target or slightly left |
"The follow-through isn’t merely a part of your swing that occurs after the ball has been hit… It’s the summation, the period at the end of the sentence." – Skillest
These components don’t work in isolation – they’re all part of a system. Proper weight transfer enables full body rotation, which then allows your arms to extend naturally and guides the club to its ideal finish. If one piece is off, the others won’t fall into place. Up next, we’ll explore common faults and how to fix them for a more consistent swing.
Common Follow-Through Faults and Fixes
When it comes to improving your golf swing, follow-through faults often highlight underlying issues in your swing mechanics. These faults are not just about how you finish – they tell a story about what went wrong earlier. Let’s take a closer look at some common follow-through problems and practical ways to address them.
Balance and Weight-Shift Issues
One of the most common errors is failing to transfer your weight properly from your trail foot. This can leave you leaning backward or stuck on your back leg at the finish, leading to inconsistent shots like hitting the ball fat or thin. A quick way to check this is by looking at your trail shoe after your swing. If it’s bent, it’s a sign your weight didn’t fully transfer forward.
The root cause is often a reverse pivot, where your weight shifts toward your front foot during the backswing and then falls back to the trail foot during the downswing. This makes a smooth follow-through almost impossible. To fix this, try the Step-Through Drill: as you start your downswing, take a small step toward the target with your back foot. This forces your weight to move forward. Another helpful exercise is the Lead-Side Balance Drill – hit a shot at 30–50% power, then lift your trail foot and hold your balance for a few seconds.
Arm and Rotation Errors
If your lead elbow bends upward after impact (known as chicken winging), it’s a sign that your body rotation has stalled. When your hips and core stop turning, your arms collapse, leaving the clubface open and often causing slices.
Another issue is a truncated finish, where your swing ends abruptly after impact. This often happens because of the "hitting impulse" – focusing too much on striking the ball instead of swinging through it.
"We all know that the follow-through is important, but it can also teach us what we should feel in our golf swing. Do we need to feel more weight shift, more turn, more arm action?"
– Brian Mogg, GOLF Top 100 Teacher
If your chest and belt buckle aren’t facing the target at the finish, it’s a sign of incomplete rotation. This forces your hands to overcompensate, leading to inconsistent and unstable shots. To work on this, try the Split-Hands Drill: grip the club with your hands 6–8 inches apart and focus on turning your torso through the swing, letting your body – not just your arms – lead the motion. These small adjustments can help you achieve a smoother, more connected finish.
Grip and Tempo Problems
A grip that’s too tight can restrict the natural release of the club through impact. Think of holding the club like you’re holding a small bird – firm enough to keep it secure but gentle enough not to hurt it.
Another common issue is a forced release, where you try to flip your wrists manually through impact. This disrupts your timing and often leads to poor contact. It usually happens when golfers rely too much on their arms instead of engaging their core. This creates a disconnected, chopping motion.
The Whoosh Drill is a great way to diagnose and improve your tempo. Flip your club upside down and swing the shaft, aiming to make the loudest "whoosh" sound in front of the ball’s position. If the sound happens at or behind the ball, it’s a sign you’re decelerating through impact.

| Fault | Visible Symptom | Likely Root Cause |
|---|---|---|
| Reverse Pivot | Weight on trail foot at finish | Improper weight shift during the backswing |
| Chicken Wing | Lead elbow bent upward | Stalled body rotation |
| Deceleration | Abrupt stop after impact | "Hitting impulse" from focusing only on contact |
| Flippy/Handsy | Unstable, whip-like finish | Stalled body rotation forcing hands to compensate |
Your follow-through is more than just a pose – it’s a mirror reflecting the quality of your swing. By identifying and addressing these faults, you can build a more consistent and reliable swing over time. Patience and focused practice are key to making these adjustments stick.
sbb-itb-bcd8bdd
Drills to Improve Follow-Through Mechanics
Turn your understanding of common swing faults into actionable progress with these drills. They focus on weight transfer, rotation, and controlling the release.
Balance and Rotation Drills
Start with the Lead-Side Balance Drill, which helps ensure proper weight transfer. Swing at 30–50% power, and as soon as you hit the ball, lift your trail foot completely off the ground. Hold this position for 2–3 seconds. By the finish, about 80% to 90% of your weight should rest on your lead foot.
For a more dynamic option, try the Step-Through Drill. Let your momentum naturally carry your trail foot forward as you swing through impact, taking a small step toward the target. Another great exercise is the Three Checkpoints Drill – after your swing, check that your trail heel is up with the sole pointing behind you, your knees are close together, and the club shaft rests behind your ears.
Impact and Release Drills
Once your balance and rotation are solid, shift your focus to impact and release mechanics. The Waist-High to Waist-High Drill is a great way to work on controlling the clubface and stabilizing your wrists. Practice short swings, moving from waist-high in your backswing to waist-high in your follow-through, keeping your lead wrist flat or slightly flexed through impact.
To refine wrist stability and impact control, use the Hit Hard, Stop Quick Drill. Swing aggressively through the ball but stop the club immediately after impact. This helps stabilize your lead wrist and prevents the clubhead from overtaking your hands too early. You can also incorporate an impact bag into your practice to focus on achieving full extension and ensuring your hands lead the clubhead through the strike.
Feedback Tools for Improvement
Using feedback tools can help you measure your progress and internalize these techniques. Video analysis is especially effective – record your swing from both down-the-line and face-on angles. Compare your finish position to that of professional players, looking for signs like your chest and belt buckle facing the target and a full weight transfer forward. Practicing in front of a mirror is another way to check your form; for instance, ensure the glove’s logo points down the target line during your release.
If you’re serious about taking your game to the next level, structured resources can provide valuable guidance. Platforms like How To Break 80 offer video courses and eBooks packed with drills and step-by-step techniques to refine your swing mechanics, including follow-through fundamentals. These tools help bridge the gap between practice sessions and actual on-course performance.
| Drill Name | Focus | Level |
|---|---|---|
| Lead-Side Balance | Static Balance / Weight Shift | Intermediate |
| Step-Through | Dynamic Momentum / Weight Transfer | Beginner |
| Three Checkpoints | Finish Position Accuracy | Beginner |
| Hit Hard, Stop Quick | Wrist Stability / Impact Control | Advanced |
| Waist-High to Waist-High | Clubface Control / Release Timing | Beginner |
Integrating Follow-Through Mechanics Into Your Game
Connecting Follow-Through to Swing Fundamentals
Your follow-through isn’t just the final part of your swing – it’s a mirror of everything that happened before impact. A weak or unbalanced finish often points to flaws in your setup or backswing. For instance, setting your lead foot slightly wider at address helps optimize hip rotation, making it easier to shift about 80–90% of your body weight onto your lead foot by the end of your swing.
The angle of the clubface at impact determines 80% of your shot’s direction, and your follow-through reflects how well you controlled it. If your lead wrist collapses or "flips" through impact, the signs will be obvious: low hands, a chest that doesn’t face the target, and a trail heel that stays planted. These details highlight how every phase of your swing affects the finish.
Nailing these fundamentals gives you the groundwork for consistent improvement.
Practice Progression for Long-Term Improvement
Building a strong follow-through requires structured, deliberate practice – not just hitting balls aimlessly. Start with slow-motion swings to focus on proper rotation and extension. Once you can hold a balanced finish at a slower pace, progress to half-speed swings with a ball, eventually working up to full-speed swings over time. This step-by-step approach helps develop the muscle memory you need for confident swings on the course.
A simple but effective habit is holding your finish for 2–3 seconds after each swing. If your finish feels unstable, it’s a sign of a mechanical issue. This pause not only reinforces accountability but also strengthens the muscle memory required for consistent ball-striking, even under pressure.
These drills directly translate to better results during your rounds.
On-Course Application
When you’re on the course, keep things simple. Focus on one key checkpoint: at the end of your swing, make sure your belt buckle and trail knee are pointed directly at the target. This visual cue encourages full hip rotation and proper weight transfer without overloading your mind with technical details.
Another tip? Always commit to a full finish, even when you’re feeling nervous. Deceleration at impact – often caused by "quitting" on your swing – is a common culprit behind blocked shots and lost distance. By deciding on a complete follow-through before you even start your backswing, you can avoid tentative swings. Your finish position then becomes a reflection of your commitment, and that confidence can lead to better scoring opportunities.
| Follow-Through Checkpoint | Indicator of Success | Common Fault if Missing |
|---|---|---|
| Trail Heel Raised | 90-degree turn on toe; weight shifted forward | "Hanging back" on trail foot; thin or fat shots |
| Hands Above Shoulders | Maintains swing plane and balance | Over-dominant hands; "flippy" or handsy finish |
| Chest to Target | Full upper body rotation and "cleared" hips | Stalled rotation; sliced shots due to an open face |
| Thighs Meeting | Adequate hip rotation; no slouching | Swinging with hands only; lack of power |
Conclusion and Key Takeaways
Your follow-through is like a mirror – it reflects the strengths and weaknesses of your swing. As professional golfer Rick Shiels points out:
"The golf swing doesn’t stop once the club makes contact with the ball – just like a baseball swing, a tennis stroke, or even a basketball jump shot, the follow-through is what completes the motion and dictates the result".
A weak or unbalanced finish can reveal issues with sequencing, weight transfer, or rotation.
At the end of your swing, about 90% of your weight should be on your lead foot, with your chest and belt buckle facing the target and your trail heel fully off the ground. Keep in mind, the clubface angle at impact is responsible for 80% of your shot’s direction. This makes wrist stability during the follow-through crucial for consistent and accurate results. These fundamentals lay the groundwork for drills and practice routines that can sharpen your technique.
To build these mechanics, focus on deliberate practice. Start with slow swings, hold your finish for three seconds, and incorporate drills like the "whoosh" drill. Spencer Lanoue, Founder of Caddie AI, emphasizes:

"A powerful, photogenic follow-through isn’t something you do, it’s something that happens. It’s the natural, unavoidable outcome of a swing that has good rhythm, proper sequencing, and solid balance".
For those looking to take their game further, resources like How To Break 80 offer tools to refine your swing. Their Maximum Distance Video Course ($49.00) and detailed eBooks provide step-by-step drills and feedback systems to help you build muscle memory and consistency over time.
The bottom line? It all comes down to commitment. Gary Player captured it perfectly when he said:
"The harder you practice, the luckier you get".
Mastering your follow-through doesn’t just improve your swing – it transforms your entire game, boosting your distance, accuracy, and confidence when it matters most.
FAQs
What are the best tips to improve my follow-through for better distance and accuracy?
To improve your follow-through while gaining both distance and accuracy, concentrate on shifting your weight onto your lead foot at impact. Keep the club shaft aligned with your lead arm, and strive for a smooth, fully rotated finish while maintaining balance. Avoid cutting your swing short or stopping abruptly after hitting the ball.
Incorporate drills like the “Hit Hard, Stop Quick” exercise into your practice routine. These drills are excellent for building consistency and reinforcing proper follow-through mechanics. With regular practice, you’ll develop the muscle memory needed to enhance your overall swing performance.
What are the most common follow-through mistakes in golf, and how can I correct them?
One of the most common mistakes in follow-through is not shifting your weight completely onto your left side. This often leaves too much weight on your right foot, leading to a bent right shoe and an unsteady finish. Another issue is when the follow-through highlights earlier swing problems, such as a weak grip, an incorrect setup, or a poor transition.
To address these issues, focus on transferring your weight fully by keeping your right foot stable and finishing with your weight on your left heel. Practice moving your left hip into a neutral position during the swing, and ensure you have a solid foundation by refining your grip, setup, and transition. These adjustments will naturally improve your follow-through, making it more fluid and consistent.
What are the best drills to improve your follow-through in golf?
Mastering your follow-through is a key ingredient for a consistent and powerful golf swing. To help you fine-tune this crucial aspect of your game, here are a few drills worth practicing:
- Weight Transfer Drill: Concentrate on shifting your weight onto your front foot right after impact. This helps you maintain balance while generating power.
- Hip Rotation Drill: Work on rotating your hips toward the target as you extend your arms. This creates a smooth and controlled finish.
- Balanced Finish Drill: Pause in your final pose for a few seconds. This reinforces stability and encourages proper posture.
If you’re looking for more tips, How To Break 80 provides free resources, including video tutorials and printable guides, featuring these drills and additional variations to sharpen your follow-through mechanics.
Related Blog Posts
- 5 Balance Drills for a Steady Golf Swing
- Fix Common Balance Issues in Your Swing
- Fixing Swing Path Problems: Common Mistakes
- Step-by-Step Guide to Perfect Weight Shift