
Mastering green speed is key to improving your putting game and avoiding three-putts. Factors like grass type, moisture, and surface firmness all influence how greens play. Here are five actionable tips to help you handle green speed effectively:
- Practice Stroke Test: Spend 10–15 minutes on the practice green to establish a baseline for your stroke distance.
- Understand Stimpmeter Readings: Learn how green speeds are measured and adjust your play accordingly.
- Check Grass and Surface Conditions: Recognize how grass type, grain, and moisture affect ball roll.
- Use the Putt-Out Speed Test: Practice consistent backstroke lengths to fine-tune your speed control.
- Drill for Distance Control: Try ladder drills to improve your accuracy over varying distances.
Golf Green Speed Guide: Stimpmeter Ratings and Grass Types
How To Calibrate Green Speeds Like The PROS!
sbb-itb-bcd8bdd
1. Use a Quick Practice Stroke Test
Take 10–15 minutes on the practice green before your round to fine-tune your putt distance for the day’s conditions. This isn’t about perfecting your stroke; it’s about getting a feel for how the greens are rolling. Even a short session can sharpen your distance control.
Start by pacing off 10 feet on a flat section of the green. Hit putts until you consistently roll the ball that distance. Pay attention to your backstroke length. Brendon Elliott, PGA Professional, explains:
"Once you know how far back to take the putter for a ten-foot roll on today’s greens, you’ve got a reference point for every putt you’ll face".
This backstroke length becomes your baseline for the round. Once you’ve established it, test your stroke at different distances.
Try two putts at varying lengths: if the ball falls short, lengthen your backstroke; if it overshoots, shorten it. Keep a steady 2:1 tempo – your throughstroke should be twice as fast as your backstroke. Avoid changing your tempo to adjust for speed; instead, let the size of your swing handle that.
After setting your baseline, practice putting drills at distances like 12, 18, and 24 feet to see how your stroke translates. This helps you solidify reference points for all the putts you’ll face. Focus entirely on distance control. As Top 100 Teacher Kellie Stenzel advises:
"If you catch yourself saying, ‘The greens are really fast,’ or ‘The greens are really slow,’ during the round, you probably didn’t prepare properly".
Keep in mind, practice greens can sometimes roll faster than course greens due to foot traffic compacting the surface. Pay attention to these differences during your warm-up and adjust your baseline as needed.
2. Learn Basic Stimpmeter Readings
The Stimpmeter is a straightforward tool used to gauge the speed of a golf green. It’s a 36-inch aluminum bar with a V-shaped groove. When raised to a 20° angle, it releases a ball at a speed of 6.00 ft/s, measuring the distance the ball rolls in feet. As Top 100 Teacher Erika Larkin puts it:
"A Stimpmeter is a simple, accurate device used to determine the speed of the green by measuring ball-roll distance".
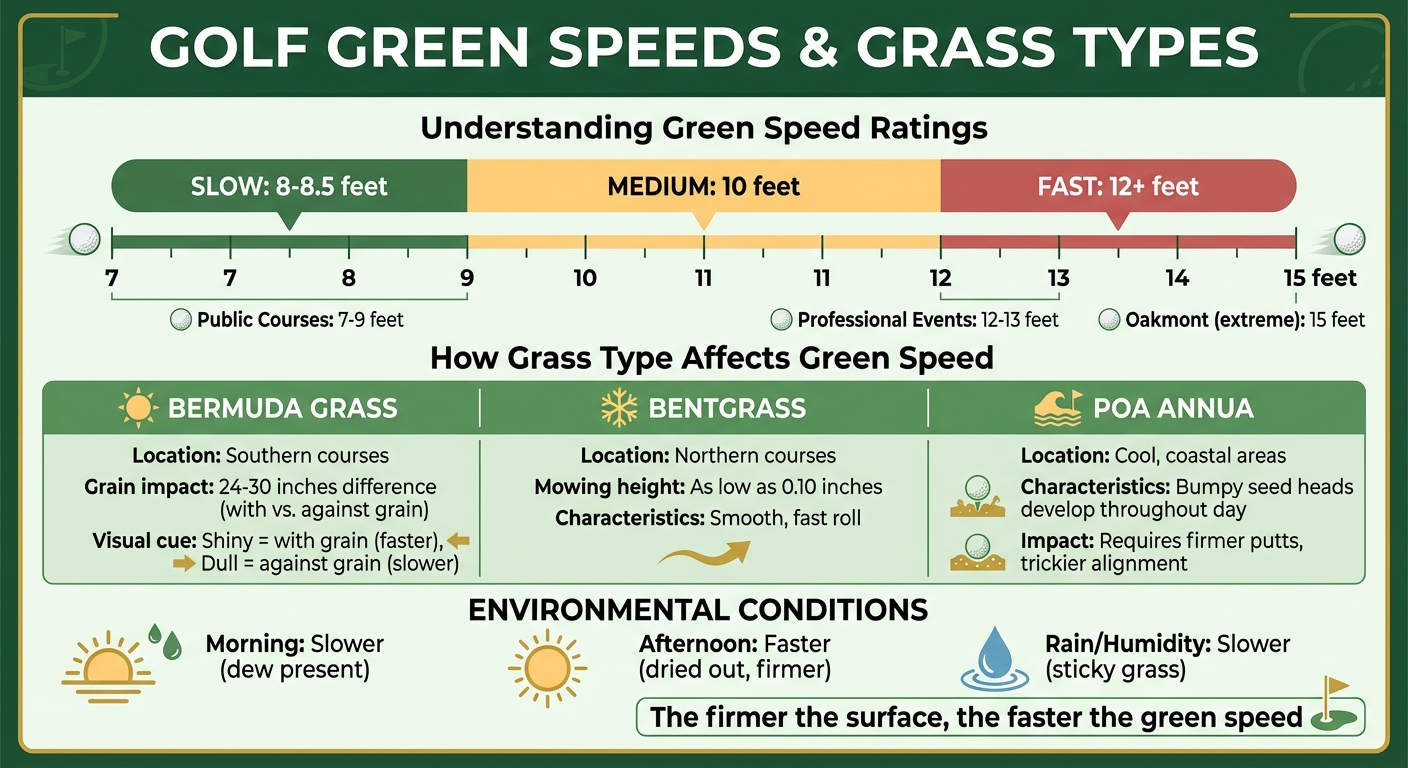
Here’s a quick guide to understanding green speeds: slow greens typically measure 8–8.5 feet, medium greens come in around 10 feet, and fast greens measure 12 feet or more. Public courses usually range between 7–9 feet, while greens at professional events can hit speeds between 12–13 feet. Some, like Oakmont, even reach an impressive 15 feet.
Before starting your round, it’s a good idea to check the day’s stimp rating at the pro shop or with the starter. For example, if they mention an 11, you’re looking at faster-than-average greens. Use this information during your warm-up by practicing putts from 25–30 feet away. This will help you calibrate your backstroke and get a feel for the day’s conditions.
Faster greens also mean more pronounced breaks, as gravity pulls the ball more sharply to the side. Knowing the stimp rating allows you to anticipate these curves and adjust your aim, giving you a better chance at sinking those tricky putts.
3. Check Grass Type and Surface Conditions
The type of grass on the green plays a big role in how fast your ball will roll. Bermuda grass, commonly found on Southern courses, has a noticeable grain – the direction the blades grow. This grain can make a huge difference in your putt. Putting with the grain can add 24 to 30 inches to your ball’s roll compared to putting against it on the same surface. Jordan Booth, Agronomist and Senior Director of the USGA‘s Green Section, explains:
"If the green between you and the hole is somewhat shiny, you’re putting with the grain and the ball may travel faster. Dull-looking grass, meanwhile, means you’re against the grain".
This makes understanding the grass type essential for judging green speed. On Northern courses, Bentgrass is common. It can be mowed as low as 0.10 inches, offering a smooth and fast roll. In cool, coastal areas, you’ll often find Poa annua, which develops bumpy seed heads as the day progresses. These bumps can make alignment trickier and require firmer putts.
Moisture is another key factor. Rain or high humidity makes grass sticky, slowing the ball down. As Zach Nicoludis, Regional Director of the USGA’s Central Region, points out: "Even a small amount of surface moisture will slow ball roll". Morning greens tend to be slower due to dew, while afternoon greens dry out, becoming firmer and faster.
Surface firmness is also critical. Dr. George Hamilton from Pennsylvania State University sums it up: "The firmer the surface, the faster the green speed". You can spot clues about firmness by checking the hole edges – frayed edges often indicate Bermuda grass with grain. On firm greens, shorten your backstroke; on softer greens, lengthen it. Observing these details and adjusting before your round will help you fine-tune your speed control.
4. Try the Putt-Out Speed Test

The Putt-Out Speed Test is an excellent way to fine-tune your feel for the greens each day. Start by finding a flat section of the practice green and measure out exactly 10 feet. From there, hit several putts, paying close attention to the length of your backstroke needed to roll the ball to your target. This exercise helps establish your baseline for speed.
Stick to a consistent 2:1 tempo, relying on backstroke length rather than altering your tempo to control speed. This method mirrors how to shoot like the pros, who instinctively maintain this rhythm.
To get a more accurate sense of the green’s pace, practice putting in opposite directions. This helps cancel out the effects of grain and slope. Once you feel confident at 10 feet, move on to longer putts – 25 to 30 feet – on both uphill and downhill slopes. This will help you understand how much force or finesse is needed for different situations.
Focus entirely on stroke weight during this drill, leaving aiming out of the equation. Christy Longfield, a GOLF Teacher to Watch, emphasizes:
"It’s not about stroke, it’s not about direction… It’s only speed".
By removing the distraction of aiming, you can concentrate solely on controlling distance. Once you’ve dialed in your speed, verify that the practice green conditions match those on the course.

If the practice green feels different from the course, recalibrate on another flat section. As Top 100 Teacher Kellie Stenzel advises:
"If you catch yourself saying, ‘The greens are really fast,’ or ‘The greens are really slow,’ during the round, you probably didn’t prepare properly".
5. Practice Ladder and Distance Control Drills
Ladder drills are an excellent way to fine-tune your distance control and adapt to varying green conditions. These exercises, much like Stimpmeter tests and practice strokes, help you develop a better sense of green speed and improve your overall putting accuracy.
Tour professionals often rely on golf tips like ladder drills to assess green speeds effectively. One popular exercise is the 10-20-30 drill. Here’s how it works: mark three spots at 10, 20, and 30 feet from the hole. Take three putts from each distance, aiming to either sink the ball or leave it 8–10 inches past the cup. This drill teaches you how extra roll minimizes break, while shorter putts tend to curve more.
Another great option is the Scoring Ladder drill. Place balls at 3, 6, 9, 12, and 15 feet from the hole, and position an alignment stick 3 feet behind it. Treat each putt as if you’re in a competitive round: score a "birdie" for sinking the putt, "par" for stopping the ball between the hole and the stick, and "bogey" for leaving it short or hitting the stick. This drill adds a layer of pressure, helping you build consistency under game-like conditions.
Once you’re comfortable with these drills on flat greens, challenge yourself by practicing on sloped greens. This will help you understand how pace influences the break of your putts. As PGA Master Professional John Hughes explains:
"Distance Controls Direction."
These drills are designed to sharpen your distance control and elevate your putting precision.
Conclusion
Being able to judge green speed accurately can dramatically cut down on three-putts and shave strokes off your game. When your speed control is on point, you effectively "make the hole larger" – a ball rolling at the right pace has a better chance of dropping, even if your line isn’t perfect. As Zephyr Melton, Editor at GOLF.com, explains:
"When you’ve got your speed dialed, it reduces three-putts and helps keep big numbers off the card."
The tips outlined here work together to refine your putting game. The 10-foot calibration drill provides a reliable baseline for every round. Learning to interpret Stimpmeter readings and grass conditions equips you to adjust to different courses on the fly. Distance control drills not only sharpen your touch but also build confidence for those pressure-packed moments. And when it comes to mid-to-long putts, focusing on distance control can have a bigger impact on your score than chasing the perfect line.
If you’re serious about stepping up your putting game, the Precision Putting Video Course from How To Break 80 is a great next step. For $49.00, it offers advanced drills and techniques tailored to enhance green reading and distance control. This course provides detailed, step-by-step guidance to help you master the skills discussed here and develop the consistency needed to lower your scores.
FAQs
How can I tell if the practice green matches the course greens?
During your warm-up, pay attention to the green speeds on the practice green and compare them to the greens on the course. Practice greens are often not identical to course greens, so take note of any differences. If you spot a variation, make the necessary adjustments to your putting stroke to align with the course conditions.
What should I do when green speed changes during my round?
When the green speed shifts during your round, it’s essential to adjust your putting by assessing the current conditions. Changes in speed often happen due to factors like moisture levels or the greens drying out. To adapt, hit a few practice putts from a consistent distance – say, 10 to 15 feet. Pay attention to how the ball rolls, and use that feedback to adjust the strength of your stroke. This approach helps you stay in control, avoid unnecessary three-putts, and keep your game on track.
How do I adjust speed on uphill vs downhill putts?
When putting uphill, apply more force to counteract the slope that naturally slows the ball. On the flip side, downhill putts require a gentler touch as gravity speeds things up. Take the time to carefully evaluate the slope and distance of each putt, adjusting your stroke to match the green’s speed. Throughout your round, keep observing the conditions to fine-tune your approach and boost your accuracy on the greens.
Related Blog Posts
- 5 Lag Putting Drills for Better Distance Control
- How to Master Speed Control on the Greens
- Top 7 Tips for Lag Putting on Fast Greens
- 7 Common Green Reading Mistakes
