
Want straighter golf shots and lower scores? It starts with controlling your clubface. The clubface angle at impact determines up to 90% of your ball’s starting direction. Misalignments – like a clubface that’s just 2° open – can send your ball way off target. Here’s what you need to know:
- Grip Matters: A neutral grip (2–3 knuckles visible on your lead hand) helps square the face and master your swing. Weak grips leave it open (causing slices), while strong grips close it (causing hooks).
- Wrist Control: Flexing your lead wrist squares or closes the face; extending it opens the face. A flat or slightly bowed lead wrist at impact is key.
- Swing Path: Pair a square clubface with a proper swing path. For a draw, swing in-to-out with a slightly closed face. For a fade, swing out-to-in with a slightly open face.
- Drills to Practice: Use impact tape, alignment sticks, and exercises like the Motorcycle Drill to refine your control.
How To Control The Clubface Like A Pro! (best way)
sbb-itb-bcd8bdd
Clubface Control Basics
Golf Grip Types and Their Impact on Clubface Control
Grip Strength and Hand Position
Your hands are the only connection you have to the club, making them the key to controlling your shots. When golfers talk about "grip strength", they’re not referring to how tightly you hold the club but rather how your hands are positioned or rotated on the grip. This rotation has a direct impact on your ability to square the clubface when striking the ball.
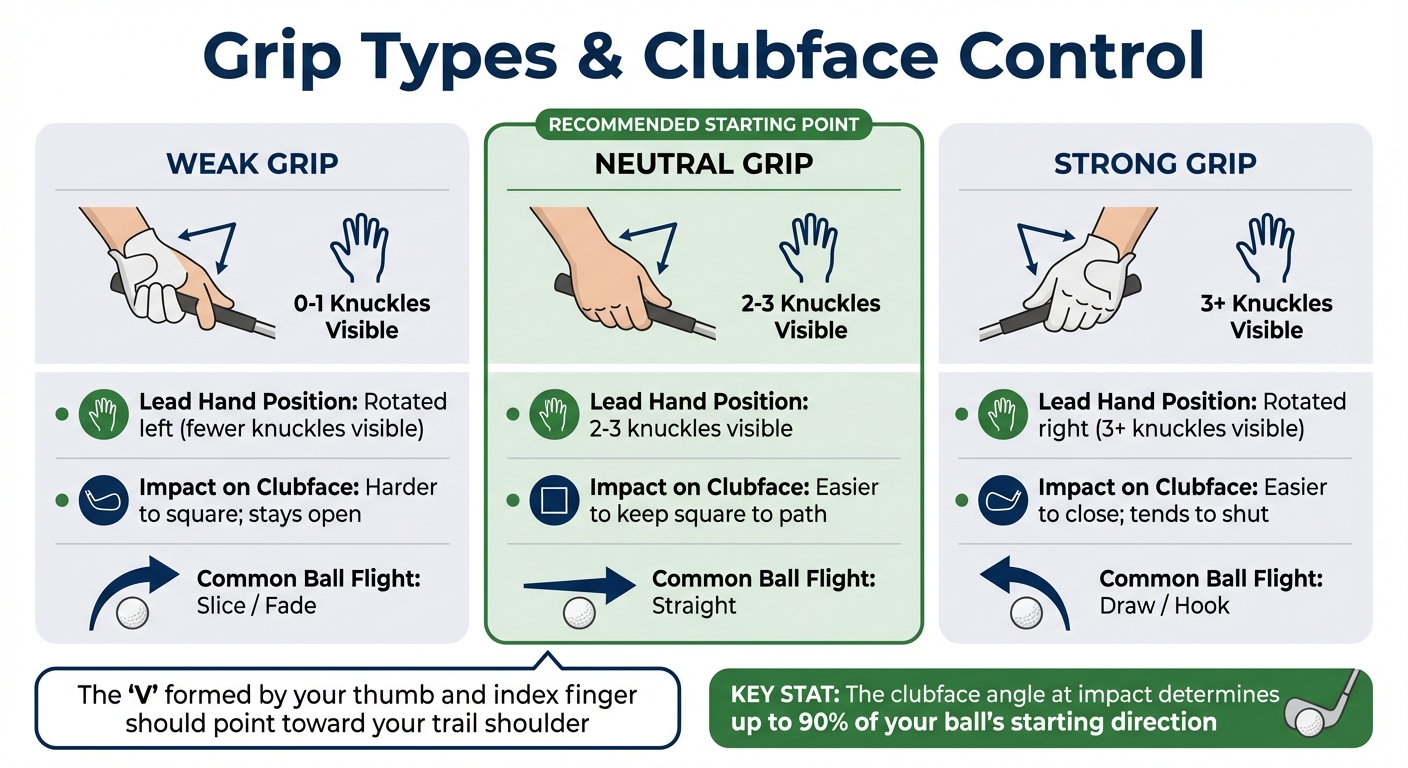
A neutral grip – where you can see 2 to 3 knuckles on your lead hand at address – is considered the starting point for most golfers. This position helps keep the clubface square throughout your swing. If you rotate your lead hand toward the target (showing 0–1 knuckles), you create a weak grip that tends to leave the clubface open, often resulting in slices. On the other hand, rotating your lead hand away from the target (showing more than 3 knuckles) produces a strong grip, which makes it easier to close the face. However, an overly strong grip can cause the face to shut too quickly, leading to hooks.
| Grip Type | Lead Hand Position (Righty) | Impact on Clubface | Common Ball Flight |
|---|---|---|---|
| Weak | Rotated left (fewer knuckles visible) | Harder to square; stays open | Slice / Fade |
| Neutral | 2–3 knuckles visible | Easier to keep square to path | Straight |
| Strong | Rotated right (3+ knuckles visible) | Easier to close; tends to shut | Draw / Hook |
To check your grip, look at the "V" formed by your thumb and index finger on both hands – it should point toward your trail shoulder. Also, make sure the club sits in your fingers, not the palms, as this allows better wrist movement and face control. Grip pressure is another factor: aim for a firm but relaxed hold. A grip that’s too loose can cause the club to shift during your swing, while gripping too tightly restricts wrist movement, making it harder to release the club properly.
Lie Angle and Clubface Alignment
The lie angle – the angle between the shaft and the ground when the club’s sole is flat – plays a big role in where your ball starts. Even if the leading edge looks square at address, an incorrect lie angle can cause the clubface to aim left or right at impact. For irons, the clubface accounts for about 75% to 85% of the ball’s starting direction. With a driver, that number increases to 90% to 95% due to lower spin and less friction.
A simple drill to improve your awareness is to tape a golf tee to your clubface using double-sided tape. This makes it easy to see exactly where the face is pointing relative to your target line during practice. Keep in mind that your dynamic lie angle – the angle at impact – differs from your setup position because your hands move ahead of the ball with forward shaft lean. This impact position is what truly matters for ball flight, not where the clubface sits at address. Understanding this alignment is a key step toward consistent control before working on your swing release or correcting errors.
Address vs. Impact Position
Knowing the difference between how your clubface looks at address versus impact is crucial for hitting consistent shots. At address, the clubface should be square, with the leading edge perpendicular to your target line. To build proper alignment, pick an intermediate target – a spot 1 to 2 feet in front of your ball on the target line – and square the leading edge to that spot before gripping the club.
At impact, things change. Your hands should be slightly ahead of the ball with a noticeable forward shaft lean. The lead wrist should be flat or slightly flexed (bowed), not extended (cupped). Studies show that top players maintain this flat or bowed lead wrist position both at the top of their backswing and at impact. Even a small error – like a clubface that’s 2° open on a 150-yard 7-iron shot – can cause the ball to miss the target by over 25 feet.
"Think of the clubface as the command center for your ball’s initial direction. It dictates where the ball starts, regardless of the path your club travels on." – Spencer Lanoue
To improve your consistency, always align the clubface first, then grip the club, and finally set your stance. Many golfers do this in reverse, which often leads to poor alignment. Practice waist-high "mini-swings" and stop at impact to check that your hands are ahead and your lead wrist is flat. Mastering these positions is essential groundwork before addressing common control mistakes in the next section.
Common Clubface Control Mistakes
Open Clubface at the Top of the Backswing
One of the most problematic errors in golf is having an open clubface at the top of your backswing. The main cause? Too much lead wrist extension, or "cupping." When your lead wrist bends backward toward your forearm at the top, the clubface ends up pointing upward and away from your target. This misalignment has a huge impact on ball flight, as confirmed by launch monitor data.
Data from over 1,000,000 swings highlights a stark difference between skill levels: golfers with handicaps over 25 average 24.3° of lead wrist extension at the top, while those under a 10 handicap average just 14.5°. Skilled players even reduce wrist extension by 4.8° during their backswing, whereas higher handicappers increase it by 5.5°. This explains why lower-handicap golfers hit straighter shots – they avoid battling an open clubface through the downswing.
Limited shoulder mobility or excessive wrist hinging (often in pursuit of lag) can also lead to unnecessary wrist extension and an open clubface. PGA Tour coach Jake Thurm estimates that 90% of golfers could improve by focusing on stabilizing their lead wrist.
To fix this, try the Static Top Drill: swing slowly to the top, pause, and check your lead wrist. If it’s cupped, flatten it until the clubface points more toward the ground. At the "shaft parallel" position in your backswing, the clubface should feel slightly "turned down" instead of pointing at the sky. An open face at the top forces you to "flip" your hands at impact, killing both consistency and speed. From here, Let’s dive into how wrist movements can further complicate clubface control, or check out more golf tips to improve your game.
Improper Wrist Hinge and Release
Your wrists play a critical role in squaring the clubface at impact, but two common mistakes can throw everything off: casting (releasing the club too early in the downswing) and flipping (extending your wrists at impact to square the face). Both errors destroy lag, sap power, and lead to weak, inconsistent contact.
Elite players excel in maintaining controlled wrist positions at impact, while high handicappers often show excessive lead wrist extension. Rolling the wrists to square the face at the last second frequently produces hooks or slices.
To improve wrist timing, try the "tee-in-grip" drill: insert a tee into the butt end of your club and, at waist height during your backswing, ensure the tee points down the target line rather than behind you. This helps maintain proper width and prevents early hinging. For flipping issues, use the Hit Hard, Stop Quick Drill: make half-swings and stop abruptly just after impact. This teaches your lead wrist to stay flexed and promotes forward shaft lean.
Another effective exercise is the Motorcycle Drill, which helps golfers struggling with an open face. Practice "revving the throttle" by flexing your lead wrist during the downswing to square the face earlier and improve rotation. Pros typically achieve about 40–50° of trail wrist extension at the top and slightly increase it during the transition to maintain lag. However, they avoid letting the lead wrist cup at impact, which is key to consistent ball striking.
Over-Manipulation of the Takeaway
A poor takeaway can set your entire swing off course, making proper face control nearly impossible. The takeaway – the initial movement away from the ball – lays the foundation for your swing. If you start by turning your hands or wrists too much, the clubface becomes misaligned, either too open or too closed. This early error forces compensations throughout the rest of the swing.
"Once you get into a bad position during transition, it is impossible to recover." – Swing Theory Golf
The most common issue is excessive lead wrist extension early in the takeaway, causing the clubface to point toward the sky when the shaft is parallel to the ground. To check this, film your swing and pause at the "shaft parallel" position. If the clubface is pointing upward, it’s too open. For golfers battling this problem, the takeaway should feel as if the clubface is pointing slightly more toward the ground than usual.
Over-manipulating the takeaway disrupts your swing path and stalls your body pivot as your hands try to compensate. Instead of relying on your hands, focus on rotating your body to move the club effectively. Practice waist-high to waist-high swings to develop better clubface control before attempting full-speed swings. Keep your lead wrist flat or slightly flexed during the takeaway – avoid any early cupping that opens the face before you even reach the top of your backswing.

Techniques to Improve Clubface Control
Forearm and Wrist Rotation
Your wrists play a critical role in setting the clubface at impact: cupping opens the face, while bowing closes it. Top-tier players minimize lead-wrist extension early in the downswing, letting their body rotation guide the shot rather than relying on a last-second hand flip. Research analyzing over a million golf swings reveals that the most skilled players maintain a flat or slightly flexed lead wrist at the top of the backswing and through impact. With 80% of a golf ball’s initial direction influenced by the clubface angle at impact, controlling your wrist action is essential for consistent ball striking.
To sharpen your wrist control, try the Motorcycle Drill: bend your lead wrist as if revving a motorcycle to square the clubface early in the downswing. For a smoother release, practice the Release Drill using waist-high to waist-high swings, keeping your lead wrist flat or slightly flexed through impact and ensuring the shaft doesn’t pass your lead forearm.
"If you can control lead-wrist extension through impact, you can also increase swing speed and power." – Britt Olizarowicz, Golf Professional
Avoid abrupt wrist rotation at impact, as it often leads to inconsistency. Instead, think of the release like throwing a frisbee with your lead hand – your wrist naturally transitions from flexion to extension as the club releases. To stabilize the clubface, maintain forward shaft lean by keeping your hands slightly ahead of the ball at impact, reducing the risk of flipping. Once you’ve mastered wrist control, align your swing path to complement a square clubface.
Swing Path Adjustments
Although the clubface angle determines 75–90% of your ball’s initial direction, your swing path must complement it to avoid slices or hooks. A proper swing path allows the clubface to return square through body rotation rather than relying on hand manipulation. A key checkpoint is P6 – when the shaft is parallel to the ground during the downswing, the clubface should align with your spine tilt to stay "on plane".
"You don’t control the clubface with your hands – you control it with your body, your wrists, and your sequence." – Martin Du Toit, ATX Golf Performance
To address an open clubface and slice path, move the ball 1–2 ball widths back toward your trail foot. This adjustment promotes an in-to-out swing path, making it easier to square the face at impact. Use alignment sticks on the ground to visualize the proper swing plane and avoid an out-to-in motion that keeps the face open.
The Intermediate Target Drill is another effective tool: place a tee about 12 inches in front of the ball on your target line and focus on swinging the clubhead over the tee with the face square to the target. During your takeaway at P2 (shaft parallel to the ground), keep your lead wrist flat and the face square to the swing arc to prevent early over-rotation.
In the final moments before impact, the clubface can rotate as fast as 1,800 to 3,600 degrees per second. Elite players reduce the "Rate of Closure" by squaring the clubface earlier in the downswing, creating a stable and repeatable face-to-path relationship. Once your swing path is dialed in, focus on a consistent release to improve accuracy.
Developing a Consistent Release
Building on proper wrist rotation and swing path, a consistent release ties everything together. A good release involves two components: clubface rotation (where the toe rotates toward the ball to square the face) and wrist unhinging (straightening the angle between your lead arm and the shaft to release lag). The key? A consistent release relies on body sequence and physics, not active hand manipulation.
"The release isn’t a conscious hand action; it’s a sequence and physics-driven move." – Adam Bazalgette, PGA
Keep your grip pressure moderate – around 4–5 out of 10 – to allow your wrists to move freely during the release. Try the Stop-and-Snap Drill with a short iron: make a half-swing and stop immediately after contact. At the finish, your lead arm and shaft should form a straight line, confirming that the club hasn’t "flipped" past your lead arm. To rehearse impact, practice waist-high to waist-high "chip" swings while maintaining a flat or slightly flexed lead wrist, building muscle memory for the release window.
| Wrist Action | Effect on Clubface | Common Result |
|---|---|---|
| Flexion (Bowing) | Closes the clubface | Promotes draws/hooks |
| Extension (Cupping) | Opens the clubface | Promotes fades/slices |
| Supination (Lead Forearm) | Rotates face to square | Consistent, powerful strike |
| Flipping (Early Release) | Rapid, unstable closure | Inconsistent direction/loft |
Skilled players aim for a slower, more controlled rate of closure, which minimizes timing errors under pressure. By squaring the clubface earlier in the downswing, better golfers give themselves more time to rotate and accelerate through the ball, avoiding the need for a last-second hand flip.
Drills for Practicing Clubface Control
Take your clubface control skills to the next level with these focused drills.
Using Impact Tape or Foot Spray
Impact tape or foot spray can turn your practice into a data-driven session. Start by cleaning and drying your clubface with a towel, then apply the tape or spray to cover the hitting area from heel to toe and from the bottom groove to the top line. Hit 5–10 shots using a 7- or 8-iron to reveal your natural strike pattern.
Once you have the marks, examine them closely. Even a half-inch mis-hit can reduce your distance by 7–10%. For irons, the sweet spot is usually on the third or fourth groove from the bottom, slightly below the geometric center.
"Using something as simple as a sticker on your clubface can deliver one of the biggest aha! moments you’ll ever have in golf." – Spencer Lanoue
To address specific issues:
- For heel strikes, try the Gate Drill: place a headcover or water bottle two inches outside the ball and practice hitting without touching it.
- For toe strikes, do the Reverse Gate Drill: position the object inside the ball to encourage full arm extension.
- For thin shots, place a folded towel six inches behind the ball. Swing without hitting the towel to promote a proper downward strike.
Alignment Stick Drills
Alignment sticks are great for instant feedback and refining hand movements. One effective exercise is the Anti-Flip Drill: slide an alignment stick along your lead forearm so it extends past the grip. Make half-speed swings, ensuring the stick doesn’t hit your ribs after impact. This drill helps you maintain forward shaft lean and avoid an early release, which can destabilize the clubface.
"The Alignment Stick Anti-Flip drill requires you to place an alignment stick along your lead side and learn to maintain a lean shaft and stabilize the face." – HackMotion
For swing path control, place two alignment sticks on the ground, parallel to your target line. These visual guides help you avoid swinging too far inside or outside, which can affect your ability to square the face consistently. Another variation involves placing a stick a few feet in front of the ball on the target line. If your ball starts right of the stick, your face was open at impact; if it starts left, the face was closed.
These drills provide a solid foundation, but exaggeration drills can take your wrist and face control even further.
Exaggeration Drills for Specific Shots
Exaggeration drills are all about feeling the extremes of clubface control. Start with the Lead Wrist Extension vs. Flexion Drill: exaggerate wrist cupping (which opens the face) and bowing (which closes the face) during small swings. This helps you physically sense how wrist movements affect the face angle.
To fix a slice, try a Draw Setup: move the ball back 1–2 widths and press the handle forward. For hooks, use a Fade Setup: position the ball forward and keep the shaft vertical. Another great exercise is the Hit Hard, Stop Quick Drill: make half-swings and freeze immediately after impact. Check if your lead arm and shaft form a straight line – this confirms a proper release.
Combining Clubface Control with Full Swing
Blending Path and Face Control
The clubface determines where your ball starts, while the swing path shapes its curve. Many golfers make the mistake of focusing solely on their swing path, which often leads to pushes or pulls if they neglect the clubface’s role.
"Focusing only on path while ignoring the face is like steering a car by turning the wheel but never checking the road." – Nick Foy, Golf Instructor
Think of the clubface and swing path as two separate controls. For a draw, aim for a swing path between +2° and +5° (in-to-out) and set the clubface 0° to +2° open to the target but closed relative to the path. For a fade, use a swing path of –2° to –5° (out-to-in) with the clubface 0° to –2° closed to the target but open compared to the path. The ideal face-to-path difference is small – around 2–4 degrees – to create a consistent curve. This balance builds on earlier wrist control and release drills, helping you square the face during a full swing.
Progression from Slow to Full-Speed Swings
Start by refining your face and path control with shorter swings. Begin with waist-high swings or 30–40 yard shots to focus on squaring the clubface without the complexity of a full swing. At this range, you can feel how your wrists influence the face. Practice 15–20 of these mini-swings while keeping your lead wrist flat through impact to develop muscle memory.
Once comfortable, move to three-quarter swings at 60–70% speed. Use a visual guide, like a tee placed 12 inches ahead on your target line, to check the ball’s starting direction. Only transition to full swings when you can consistently square the face at slower speeds. This gradual method is crucial, especially since the clubface can rotate up to 3,600 degrees per second in the final moments before impact.
Pre-Impact Checkpoints
Elite players square the clubface earlier in the downswing, relying on body rotation and stable wrists rather than last-minute hand adjustments. Focus on these checkpoints during practice:
- Takeaway: When the club shaft is parallel to the ground, the clubface should match your spine angle. If the face points toward the sky, it’s likely open.
- Top of the Backswing: Keep your lead wrist flat or slightly bowed. A cupped wrist here often results in an open face at impact.
- Downswing: As the shaft returns to a parallel position, ensure the clubface aligns with your spine tilt, and your trail elbow leads in front of your hip.
- Impact: At contact, your hands should be ahead of the ball, with a forward shaft lean and a flat lead wrist.
These checkpoints tie together earlier drills, creating a solid foundation for consistently squaring the clubface at impact.
How To Break 80 Resources

Fix Your Slice & Hit a Draw Video Course
The Fix Your Slice & Hit a Draw Video Course ($99.00) tackles the main culprit behind slices: an open clubface caused by too much lead wrist extension. This course teaches you how to correct that with wrist flexion, helping you close the clubface and hit a draw.
"Your slice isn’t primarily a club path problem. It’s a club face problem." – Erik Schjolberg, Founder, EJS Golf
Instead of relying on last-minute hand adjustments, the course focuses on early clubface squaring, which leads to more consistent and powerful swings. You’ll also learn setup tweaks – like positioning the ball further back in your stance and adding forward shaft lean – to create an in-to-out swing path with a closed clubface. Players often see a 30–40 yard reduction in shot dispersion after just one session.
This video course is part of How To Break 80’s broader lineup of tools aimed at improving your clubface control, delivering better accuracy and distance.
Maximum Distance Video Course
If you’re looking to add distance without losing control, the Maximum Distance Video Course ($49.00) is your go-to. This course highlights the importance of striking the center of the clubface for optimal energy transfer and maximum distance. It also introduces the draw setup for distance, which involves slightly closing the clubface at impact to create a right-to-left ball flight that enhances roll.
You’ll dive into techniques like early squaring and proper forearm rotation, avoiding the premature wrist flips that can compromise both accuracy and power. With a square clubface, you’ll unlock more power and distance across all your clubs.
Conclusion
Mastering clubface control is a game-changer – especially since the clubface angle at impact determines about 75–90% of your ball’s starting direction. It all boils down to understanding that your lead wrist plays a crucial role, acting like a steering wheel: flexion (bowing) squares or closes the face, while extension (cupping) opens it.
"Until you can consistently control the clubface, golf feels like guesswork." – HackMotion
To build a powerful and repeatable swing, focus on the fundamentals. Start with your grip and wrist positioning to ensure the clubface stays square at impact. Top players square the clubface early in the downswing, which allows them to rotate their bodies fluidly through the shot. This eliminates the need for a last-second flip, which can throw off timing. A great way to practice this is by starting with waist-high swings to develop muscle memory before moving on to full-speed shots.
Incorporating drills – like the Motorcycle Drill – into your routine can help you build the awareness and consistency needed for better clubface control. For a more structured approach, consider resources like the Fix Your Slice & Hit a Draw Video Course ($99.00) or the Maximum Distance Video Course ($49.00) from How To Break 80. These step-by-step guides offer practical solutions to common clubface issues, turning what might feel like guesswork into a reliable and repeatable process for any golfer.
FAQs
How do I know if my clubface is open or closed at impact?
To figure out whether your clubface is open or closed at impact, focus on the face angle – this is the direction your clubface points compared to the target line. If the face is open, it points to the right; if it’s closed, it points to the left. Even small changes in the face angle can have a big effect on where the ball ends up. Watching the flight of your ball can also give you clues about whether your face angle needs tweaking.
Should I fix my grip or my lead wrist first?
Fixing your lead wrist is a great first step to improving clubface control. Why? Because it plays a big role in alignment and consistency at impact. A flat or slightly bowed lead wrist can help keep the clubface steady. However, if you’re dealing with wrist instability or misalignment, the root cause might be your grip. Since your grip influences how your wrist moves and positions itself, it’s essential to get the basics of your grip right first. Focus on what’s causing the issue based on the specific challenges in your swing.
What’s the fastest drill to stop flipping the clubface?
The quickest way to stop flipping the clubface is to work on drills that emphasize proper impact position while providing instant feedback. One helpful drill is to place a phone in your front left pocket and practice your swing, focusing on pushing the phone deeper into the pocket during the downswing. This movement encourages you to maintain your posture and prevent early extension, both of which are key factors in avoiding a flipped clubface.
Related Blog Posts
- Why Does My Golf Ball Slice? Expert Solutions Explained
- Impact Position vs. Clubface Control
- Open vs. Square Clubface: Key Differences Explained
- Clubface vs. Swing Path: Ball Flight Impact
