
Shot shaping is all about controlling your ball flight – draws, fades, high shots, and low shots – with precision. The key lies in small setup adjustments, not massive swing changes. This article outlines five practical drills to improve your shot shaping consistency and tighten your dispersion:
- Alignment Gate Drill: Focuses on starting line control using alignment sticks to guide your shots.
- Motorcycle Wrist Drill: Teaches lead wrist flexion for better clubface control and reduced slices.
- Inside Takeaway Path Drill: Helps refine your takeaway for a consistent swing path.
- Ball Position and Handle Height Drill: Adjusts trajectory and curve by tweaking ball position and handle height.
- Target Ladder Drill: Simulates real-course scenarios to practice shaping shots to specific targets.
These drills are designed for golfers of varying skill levels and can be practiced at any driving range. By incorporating them into your routine, you’ll gain better control, improve accuracy, and build confidence in shaping shots under pressure.
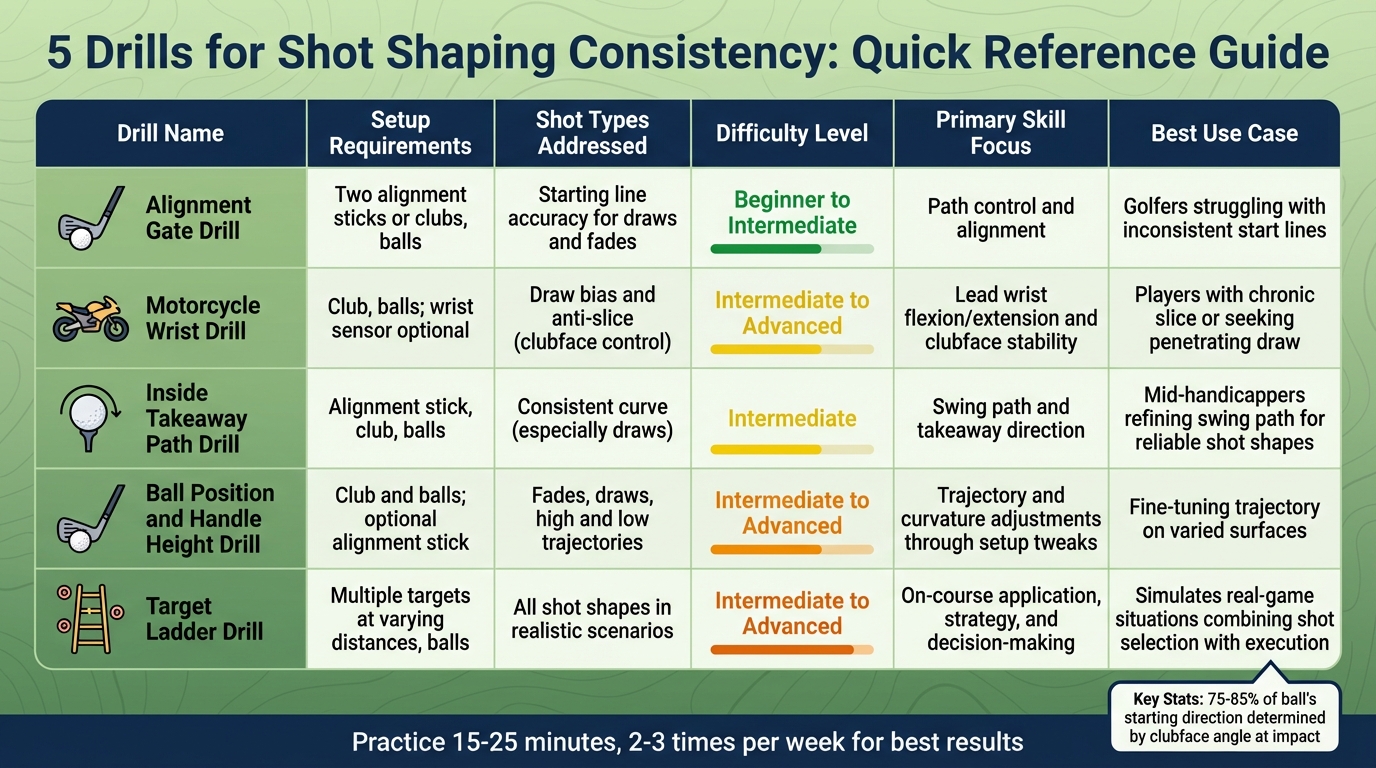
5 Golf Shot Shaping Drills Comparison Chart
The BEST Way To SHAPE Your Shots || Starting Line Drills
1. Alignment Gate Drill for Starting Line Control
To refine your starting line control, set up two alignment sticks or spare clubs a few feet ahead of the ball to create a visual corridor aligned with your intended start line. The goal? Hit your shots through this "gate" consistently, no matter the shot shape you’re working on.
Start with a neutral setup before experimenting with different shot shapes. For a straight shot, position the gate to point directly at your target. Align your clubface along this line and set your body parallel to the gate. When you swing, the ball should pass cleanly through the corridor and head toward the target with minimal curve. Studies show that clubface angle at impact determines 75–85% of a ball’s starting direction, so mastering this drill is key to controlling face position during impact.
For a draw (a right-to-left curve for right-handers), adjust the gate to aim 5–10 yards right of your final target. Align your clubface with the gate and adjust your stance slightly narrower, with your body also pointing right of the gate. Move the ball back in your stance and strengthen your grip. Swing along your body line, allowing the ball to start through the gate to the right before curving back left toward the target.
For a fade (a left-to-right curve), shift the gate to point 5–10 yards left of your final target. Align your clubface just right of the gate (closer to the actual target line) and open your stance so your body points left of the gate. Position the ball slightly forward in your stance and ease your grip to keep the clubface open. This setup should produce a shot that starts left, passes through the gate, and curves back to the right. According to Titleist instructors, alignment sticks can help players fine-tune the amount of curve they want, such as a precise 10-yard fade, eliminating the need for guesswork.
If your shots consistently miss one side of the gate, start by adjusting your clubface alignment, then tweak your body position as needed. Using a smartphone to review your setup can help ensure your gate is correctly aligned. Practicing with the Alignment Gate Drill not only sharpens your shot shaping but also builds the consistency needed for precise control on the course.
2. Motorcycle Wrist Drill for Clubface Control
The Motorcycle Wrist Drill is a straightforward way to fine-tune your control over the clubface angle using a wrist movement that feels like revving a motorcycle throttle. By flexing (or bowing) your lead wrist during the downswing, you can close the clubface for a draw or keep it slightly open for a fade – all without needing to overhaul your entire swing. This drill directly tackles a common issue among amateur golfers: an overextended lead wrist that leaves the clubface open at impact, resulting in slices.
Here’s how it works: Start by setting up to the ball in your usual stance. As you begin your downswing, mimic the action of twisting a motorcycle throttle by flexing your lead wrist. By the time the club shaft is parallel to the ground (the P6 position), you should feel a pronounced bowing in your wrist. Keep this flexed position through the moment of impact, then allow your wrist to naturally release during the follow-through. To get comfortable with this movement, begin with slow, half-swings without a ball. Once the motion feels natural, move on to full swings, focusing on maintaining the wrist position throughout.
Even small tweaks in wrist flexion can have a big impact on the clubface angle and shot shape. For a draw, increase the wrist flexion while adjusting your ball and body position to create an inside-out swing path. For a fade, reduce the flexion and reposition your ball and stance to encourage an outside-in path. Some instructors who use wrist-sensor technology, like HackMotion, report that golfers struggling with slices often see immediate improvements. After just 10–20 repetitions, many slicers experience a 10–15 yard reduction in their slice curve.
This technique offers a faster and more reliable way to adjust ball flight compared to changing your entire swing path. Small changes in wrist flexion or extension can significantly affect the face angle at impact, making this an efficient "lever" for controlling your shots. The drill is particularly effective for mid-handicap golfers (10–20 index) aiming to achieve a higher level of precision. By training your lead wrist to manage the clubface angle independently, you can gain better control without needing to overhaul your swing mechanics.
In addition to improving alignment, this drill can lead to noticeable results. Look for consistent 5–10 yard shot shapes and tighter accuracy with your stock shots. To avoid common pitfalls, be mindful of over-flexing (which can lead to hooks), releasing your wrists too early, or losing the bowed position after impact. Staying disciplined with this motion will help you maintain consistency under pressure and improve your performance on the course.
3. Inside Takeaway Path Drill for Consistent Curve
The Inside Takeaway Path Drill is a great way to refine your takeaway and set a solid foundation for consistent shot shaping. This exercise uses a headcover or alignment stick to help you train a neutral takeaway path. Many amateur golfers struggle with improper takeaways, which often lead to inconsistent ball flights like weak fades, slices, or hooks. By focusing on a neutral or slightly inside path, you create a reliable base that can work for both draws and fades, with only minor adjustments to ball position and wrist angles.
Here’s how to set it up: Place a headcover or alignment stick about 6–8 inches outside the ball, parallel to your target line. Position the ball in the center of your stance and take your usual setup. During your takeaway, aim to swing the clubhead under or around the guide without making contact, while keeping the clubface square. The idea is to feel the clubhead "wrap" around your body naturally, avoiding any lifting motion or pulling the club too far behind you. Start with slow, half-speed swings without hitting a ball to get a feel for the motion. If you notice the club hitting the guide, it’s a sign that your takeaway is veering off the intended neutral path. Once you’re comfortable, progress to full swings.
This drill offers instant feedback. If the club hits the guide, your takeaway is moving too far outside. If the club disappears from view, it’s going too far inside. To fine-tune your technique, review your swing on video to check wrist position and ensure the clubface stays stable. Once you’ve nailed the neutral path, you can incorporate wrist control from the Motorcycle Drill – flexing slightly for draws or extending for fades – without needing to completely rebuild your swing.
For more advanced practice, try adding variations. Adjust the ball position or create a "window" using alignment sticks to challenge yourself. Alternating between these setups during practice helps you feel the subtle differences in wrist action and setup while sticking to the same basic takeaway path. This method reflects modern instruction’s focus on small, precise tweaks rather than overhauling your entire swing, making shot shaping more dependable when it counts.
sbb-itb-bcd8bdd
4. Ball Position and Handle Height Drill for Trajectory and Curve
This drill builds on earlier techniques by showing how small setup changes can directly influence your shot’s trajectory and curve. The Ball Position and Handle Height Drill focuses on how adjusting the ball’s position and the handle’s height at address can alter launch angles and shot shapes. For example, moving the ball forward with a lower handle increases loft and opens the clubface, resulting in a higher fade. On the flip side, placing the ball farther back with a higher, forward handle reduces loft and closes the clubface, creating a lower draw.
Here’s how to practice and master these adjustments:
- Start with a 7-iron or 8-iron and hit 5–10 shots from your usual ball position to establish a baseline for your standard trajectory and curve.
- For a fade setup, move the ball one ball-width forward, slightly lower the handle, align slightly left, and hit 10 shots aiming for a higher, softer fade.
- For a draw setup, move the ball one ball-width back, raise the handle with a forward shaft lean, align slightly right, and hit 10 shots to produce a lower, more penetrating draw.
- Once you’re comfortable, alternate between the two setups – hit one draw, then one fade – for 10–20 balls. Keep your swing consistent and let the setup adjustments dictate the shot shape. Observe the ball’s starting direction, curvature, and height, tweaking the ball and handle positions slightly until your patterns are reliable.
Resist the urge to make mid-swing changes or over-adjust the ball position. Instead, trust your setup to control the shot. Use visual markers like your belt buckle or lead thigh for alignment: for a draw, the grip end should be slightly higher and more forward; for a fade, the handle should be lower and more centered under your sternum.
Here’s a quick reference table summarizing the adjustments for each shot type:

| Shot Type | Ball Position | Handle Height/Position | Expected Result |
|---|---|---|---|
| High Draw | Slightly back | Higher/forward | Right-to-left curve with a higher launch |
| Low Fade | Forward | Lower/back | Left-to-right curve with a lower flight |
| Draw | Back | Forward/higher | Right-to-left curve |
| Fade | Forward | Lower/back | Left-to-right curve |
5. Target Ladder Drill for Real-Course Shot Shaping
The Target Ladder Drill is all about bringing your shot-shaping skills into a more realistic, on-course setting. Instead of repeatedly hitting the same shot to a single target, this drill challenges you to work through 3–4 targets at different distances, each requiring a specific shot shape. It’s designed to mimic real golf scenarios – like hitting a fade around a tree on one hole and a draw to stick the green on the next.
Here’s how it works: Decide on the shot shape for each target before you start. For instance, hit a draw to the closest target, a fade to the middle target, and a high draw to the farthest target. Once you’ve completed that sequence, reverse the order and mix up the shot shapes. The key is to reset your setup for each swing, just like you would during a round, so you’re not relying on the repetition of the same motion.
This drill isn’t just about mechanics – it’s about strategy. Track each shot to ensure it starts on the correct line and curves as planned. Don’t stress too much about distance; instead, focus on getting the shot shape right. Aim for 70–80% accuracy with your start line and curve before increasing difficulty by adding more targets or narrowing your margins for error.
Want to make it even more realistic? Add virtual hazards to your targets. For example, imagine water on the right side of one target. You’d then adjust your strategy to hit a fade that starts away from the hazard and curves safely back toward the target. This approach sharpens both your decision-making and your ability to execute under pressure, reinforcing the setup and swing adjustments you’ve practiced.
Set aside 15–25 minutes, 2–3 times per week for this drill. With consistent effort, you’ll notice a boost in your confidence when it comes to shaping shots during a round. For additional drills and practice ideas, check out resources like How To Break 80 (https://break80.guide), which can help you refine your skills and work toward hitting specific scoring milestones.
Comparison Table
Here’s a quick-reference table that highlights the key elements of each drill. Use it to find drills that align with the shot-shaping techniques mentioned earlier.
| Drill | Setup Requirements | Shot Types Addressed | Difficulty Level | Primary Skill Focus | Best Use Case |
|---|---|---|---|---|---|
| Alignment Gate Drill | Two alignment sticks or clubs, balls | Starting line accuracy for draws and fades | Beginner to Intermediate | Path control and alignment | Perfect for golfers struggling with inconsistent start lines |
| Motorcycle Wrist Drill | Club, balls; (wrist sensor optional) | Draw bias and anti-slice (clubface control) | Intermediate to Advanced | Lead wrist flexion/extension and clubface stability | Great for players dealing with a chronic slice or aiming for a more penetrating draw; can be practiced on the range, in simulators, or even at home using a mirror |
| Inside Takeaway Path Drill | Alignment stick, club, balls | Consistent curve (especially draws) | Intermediate | Swing path and takeaway direction | Ideal for mid-handicappers looking to refine their swing path for reliable shot shapes |
| Ball Position and Handle Height Drill | Club and balls; optional alignment stick for ball position markers | Fades, draws, high and low trajectories | Intermediate to Advanced | Trajectory and curvature adjustments through setup tweaks | Best for fine-tuning trajectory on varied surfaces |
| Target Ladder Drill | Multiple targets at varying distances, balls | All shot shapes in realistic scenarios | Intermediate to Advanced | On-course application, strategy, and decision-making | Simulates real-game situations by combining shot selection with execution to meet scoring goals |
The Motorcycle Wrist Drill and Ball Position and Handle Height Drill demand more precision and body control, making them a better fit for golfers with solid ball-striking skills. On the other hand, the Alignment Gate Drill provides a straightforward starting point for beginners working on shot shaping.
Conclusion
These drills work together to sharpen your control over the starting line, clubface, swing path, and trajectory, helping you transition from practice sessions to on-course success. The Alignment Gate Drill locks in your starting line, while the Motorcycle Wrist Drill ensures reliable clubface control – two key factors for consistent ball flight. The Inside Takeaway Path Drill refines your swing path for repeatable shot shapes, and the Ball Position and Handle Height Drill helps you adjust trajectory and shot shape with simple setup tweaks. Finally, the Target Ladder Drill ties it all together by simulating real-course scenarios.
By incorporating these drills into your routine, you can turn casual practice into a purposeful improvement plan. Keep track of your progress by noting the drill, date, common misses, and typical ball curves. Over a few weeks, you’ll notice tighter dispersion and more predictable shot patterns. Data from HackMotion highlights how proper wrist flexion and extension lead to consistent face-to-path differentials, making these drills easy to measure and track.
As your consistency improves, the results on the course will speak for themselves. Studies show that professional golfers hit their stock shot 80–90% of the time and use shaped shots strategically. These adjustments can improve greens in regulation by 15–20% and allow for precise 10-yard shot shape changes, giving you a clear edge in performance.
Start by focusing on your biggest challenge – whether it’s alignment, clubface control, or trajectory – and build from there. Gradually adding the other drills will help you solidify your stock shot. Remember, true consistency comes from focused repetition with feedback, not by trying everything at once. For more tips on improving your swing mechanics and shot shaping, check out How To Break 80, where you’ll find eBooks and video courses featuring drills like these.
FAQs
How can I choose the right drill for my skill level?
To choose the right drill for your skill level, start by pinpointing the aspects of your game that need the most work – whether it’s accuracy, control, or consistency. Look for drills that align with where you’re at in your journey. If you’re just starting out, go for beginner-friendly exercises that build your confidence. As you advance, focus on drills designed to fine-tune specific techniques. Tackling one area at a time will help you see steady progress.
Can these drills help me fix my slice or hook?
Practicing these drills can sharpen your ability to control shot shaping, making it easier to tackle common challenges like slices or hooks. These targeted exercises focus on refining your swing mechanics, ultimately giving you greater command over your ball’s flight path.
The secret to success? Consistency. Regularly working on these drills can bring steady progress and noticeable results in your shots over time.
How often should I practice these drills to improve my shot consistency?
To improve your shot-shaping consistency, aim to work on these drills 3 to 4 times a week. The secret to progress lies in sticking to a routine that fits your schedule.
Even brief, focused practice sessions can help you develop better control and boost your confidence over time.
Related Blog Posts
- How Club Choice Affects Shot Shape
- Fixing Swing Path Problems: Common Mistakes
- 5 Steps to Align for Accurate Drives
- Shot Shaping Basics for Approach Accuracy
