
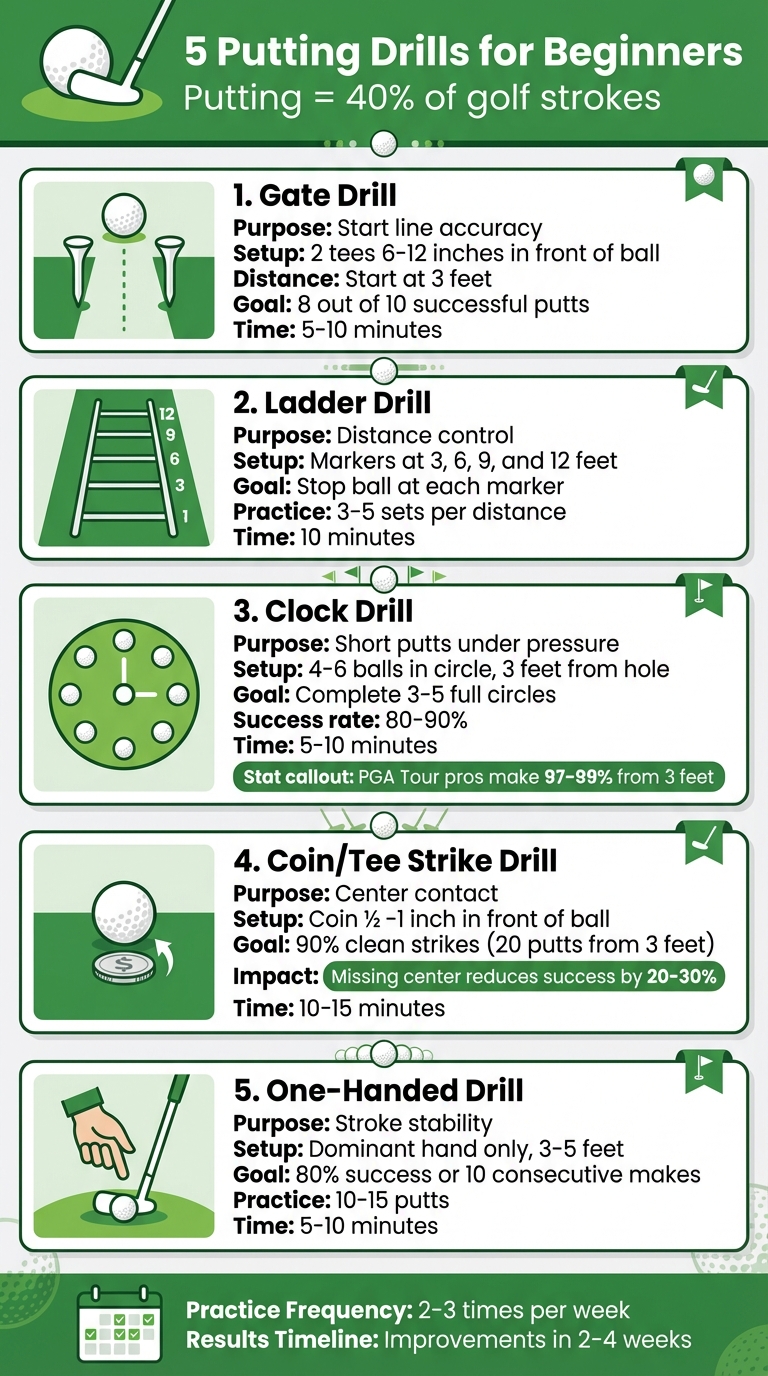
Putting makes up nearly 40% of your golf strokes, so improving this skill can quickly lower your scores. For beginners, mastering short putts and avoiding three-putts builds confidence and helps you play more freely. Here are five simple drills to boost your putting game:
- Gate Drill: Focus on starting the ball on your intended line using two tees as a "gate."
- Ladder Drill: Improve distance control by stopping the ball at specific markers.
- Clock Drill: Practice pressure-packed short putts from 3 feet using balls placed in a circle around the hole.
- Coin or Tee Strike Drill: Ensure consistent center contact by avoiding a marker placed just in front of the ball.
- One-Handed Putting Drill: Strengthen stroke stability by isolating your dominant hand.
Each drill takes 5–15 minutes and can be practiced on a course or at home with minimal equipment. Consistent practice 2–3 times a week can lead to fewer three-putts and greater confidence in just a few weeks.
5 Essential Putting Drills for Beginner Golfers
Top 10 BEST Putting DRILLS To Improve YOUR Putting | For Beginners and Advanced Golfers
1. Gate Drill for Start Line Accuracy
The Gate Drill is a straightforward way to train your putter to start the ball on your intended line, making it effective for golfers of all skill levels. Here’s how it works: set up two tees about 6–12 inches in front of your ball, positioned slightly wider than your putter head. These tees form a narrow "gate" that your ball must roll through without touching either side.
Start practicing from just 3 feet away from the hole. At this distance, you can focus entirely on getting the ball to roll on the correct line without worrying about speed. The goal? Successfully roll the ball through the gate at least 8 out of 10 times. This drill is particularly useful because even a small error – like a 1° face angle that’s slightly open or closed – can cause a miss from 8 to 10 feet. That’s why developing precision here is so important.
To get the most out of the drill, focus on refining your stroke. Use a smooth, pendulum-like motion powered by your shoulders and arms, while keeping your head and lower body steady. Maintain a light grip to avoid jerky movements. Once you’ve mastered 8 out of 10 successful putts from 3 feet, increase the challenge by moving back to 5–6 feet and narrowing the gate.
This drill doesn’t just belong on the course – it’s perfect for a quick 5- to 10-minute warm-up at the start of any practice session. You can even do it at home on a putting mat or short-pile carpet. The repetition builds muscle memory, which is critical for those short, pressure-packed putts where starting the ball on the right line can make all the difference.
2. Ladder Drill for Distance Control
The Ladder Drill is a fantastic way to sharpen your touch and control on the greens – skills that are essential for avoiding those dreaded three-putts. To set it up, place tees or markers at 3 feet, 6 feet, 9 feet, and 12 feet from the hole. Your goal? Stop the ball at each marker without overshooting. If you do, you’ll need to reset and try again.
Start at the 3-foot marker, aiming for the hole. Once you’re consistently hitting your target, move back to the 6-foot mark. Now, aim to stop the ball at the 3-foot marker. Repeat this process as you progress to the 9- and 12-foot markers. This gradual progression helps you fine-tune your stroke and develop the feel needed for precise distance control.
Focus on keeping your stroke straight and your grip light – about a 4/10 on the pressure scale. Use a smooth, pendulum-like motion driven by your shoulders, letting your arms hang naturally. Position your eyes directly over the ball for better alignment. The key is to match the length of your backstroke to the distance you want the ball to travel.
Practice 3–5 sets at each distance, aiming to stop the ball within 6 inches of the target. Spend about 10 minutes on this drill to build consistency and reinforce muscle memory. As you improve, try narrowing the gaps between the markers to make the drill more challenging.
Ready to tackle pressure-packed short putts? Up next: the Clock Drill.
3. Clock Drill for Short Putts Under Pressure
Short putts are game-changers. They can turn two-putts into pars and help you avoid those dreaded three-putts. The Clock Drill is a great way to sharpen your skills from 3 feet – where even PGA Tour pros make an impressive 97–99% of their attempts. For beginners, getting comfortable with this range means you can approach those must-make putts with confidence.
Here’s how it works: Place 4–6 balls in a circle around the hole, each exactly 3 feet away – roughly the length of your putter. Arrange them like numbers on a clock face on a flat section of the practice green to keep the break and distance consistent. Start at one "hour", and work your way around the circle, sinking each putt before moving to the next ball.
To add a challenge, introduce a "reset rule." If you miss a putt, start the drill over. This creates a pressure element, helping you develop the composure needed for real-game situations. Keep track of how many complete circuits you can make without a miss – it’s a great way to measure your progress. Focus on maintaining a smooth, steady stroke throughout.
Aim to complete 3–5 full circles in a session, which adds up to about 12–30 putts and should take 5–10 minutes. Once you’re consistently making 80–90% of your putts, increase the difficulty. Move the balls back to 4 feet, or add more positions around the "clock." For an extra layer of practice, include uphill and downhill spots to work on speed control for different slopes. The more you challenge yourself, the more prepared you’ll feel when it counts.
Before heading out for your round, dedicate a few minutes to this drill on the practice green. Sinking 20–30 short putts in a row builds immediate confidence, so when you face those critical 3-footers on the course, you’ll know you’ve already nailed them countless times during practice.
sbb-itb-bcd8bdd
4. Coin or Tee Strike Drill for Center Contact
Hitting the sweet spot on your putter is a game-changer. Missing it – even slightly – can reduce ball speed and lower your chances of sinking the putt by 20–30%. That’s where the Coin or Tee Strike Drill comes in, helping you master consistent, centered contact.
Here’s how it works: Set your ball on the green or a practice mat. Place a coin, tee, or even a bottle cap about ½–1 inch in front of the ball, directly on your target line. Your goal? Strike the ball cleanly without disturbing the marker. If you hear a "click" or notice the marker move, it’s a sign your putter path might be off and needs adjustment.
Start with 20 putts from 3 feet, aiming to hit the ball cleanly at least 90% of the time. Once you’re consistently achieving this, push the challenge further by increasing the distance to 6–10 feet. Practicing for just 10–15 minutes can make a big difference in solidifying your center contact.
The beauty of this drill is its simplicity – you only need a coin, tee, or similar small object. It’s perfect for home practice on a putting mat and fits seamlessly into your routine. Use it after alignment drills, like the Gate Drill, and before moving on to distance-control exercises, such as the Ladder Drill. It’s the perfect bridge between refining your aim and developing stroke stability.

5. One-Handed Putting Drill for Stroke Stability
This drill focuses on improving stroke stability by isolating your dominant hand, helping you refine control and identify potential weaknesses in your putting technique.
Practicing with just your dominant hand can reveal issues like inconsistent tempo or shaky control – flaws that might go unnoticed during regular two-handed practice. By isolating this hand, you strengthen its ability to guide the stroke smoothly and consistently.
To try this drill, grip the putter lightly with your dominant hand, choking down slightly for better control. Keep your eyes locked on the ball and execute a smooth stroke, maintaining a 2:1 ratio between your backswing and follow-through. Use your shoulders to drive the motion.
Start with 10–15 putts from 3–5 feet, using tees or alignment sticks to ensure a straight path. Aim for either an 80% success rate or 10 consecutive makes before moving back to longer distances, like 6–10 feet.
Dedicate 5–10 minutes to this drill, three to four times a week. Begin each session with a warm-up of short putts, alternating hands to develop feel. Then, perform 10 full-stroke repetitions. If you’re practicing indoors, a putting mat works perfectly for this exercise.
This drill not only strengthens your dominant hand but also lays the groundwork for a steady, reliable stroke. When you return to a two-handed grip, your dominant hand will anchor the motion, while your non-dominant hand plays a supportive role in maintaining consistency.
Building a Simple Practice Routine
To make the most of your putting practice, try structuring a 30-minute session that balances fundamentals with pressure-based drills. Start with a quick 5-minute warm-up, focusing on smooth tempo and solid contact by rolling easy 3–5-foot putts. This helps you ease into the session and sets the tone for consistency.
Next, dive into focused drills. Spend about 7 minutes on the Gate Drill from 4–6 feet. Roll 20–30 putts through a tee gate to refine your putter face alignment. Then, shift to the Ladder Drill for another 7 minutes. Place 4–5 balls at increasing distances, such as 10, 15, 20, and 25 feet, and aim to stop each ball just past the hole. This drill is perfect for honing your distance control.
Afterward, dedicate 6 minutes to the Clock Drill. Set up 6–8 balls in a circle around the hole, about 3 feet away. The goal is to complete a full round of putts without missing; if you do miss, restart the sequence. This drill is great for simulating on-course pressure and improving focus. Wrap up the session with 5 minutes on the Coin or Tee Strike Drill, hitting 20–30 putts to work on centered contact and a smooth roll.
For the best results, aim to practice this routine 2–3 times a week. Over time, you’ll notice improvements in distance control, fewer three-putts, and higher success rates on the greens. To track your progress, keep a notebook handy to record your longest streaks and proximity to the hole.
If you’re looking for more detailed guidance, consider the Precision Putting Video Course from How To Break 80. For $49.00, this course provides a step-by-step system packed with drills and techniques to help you develop consistent and accurate putting skills over time.
Conclusion
Practicing a handful of straightforward drills can make a world of difference for beginners looking to improve their putting. Instead of diving into complicated swing adjustments, sticking to a regular routine with drills like gate, ladder, clock, coin/tee strike, and one-handed practice can deliver quick and noticeable results. Many beginners who commit to this approach see improved speed control and greater confidence with short putts within just 2–4 weeks, and with steady practice, they often reduce their three-putts significantly over a few months.
These drills are effective because they focus on the essentials. By mastering the basics, you’ll step onto any green in the U.S. with a reliable routine to help you control speed, aim accurately, and sink more short putts. The payoff? Lower scores and a more enjoyable experience every time you play. Plus, these foundational skills pave the way for even greater improvement down the line.
To build on these drills, consider incorporating a more structured practice plan. The Precision Putting Video Course from How To Break 80 provides step-by-step instructions, detailed practice plans, and video demonstrations to help you refine your game and lower your scores.
Start with one drill, adding others as your confidence grows. Keep track of your three-putts to monitor your progress. The gains you make during practice will naturally boost your performance – and confidence – when it’s time to hit the course.
FAQs
How often should beginners practice these putting drills to see improvement?
To see noticeable improvement, try practicing these putting drills 3 to 4 times a week. Regular practice not only strengthens muscle memory but also enhances your confidence on the green. Even brief, concentrated sessions can significantly improve your precision and control over time.
Can I practice these putting drills at home, and what do I need to get started?
You can absolutely practice these putting drills at home with just a few essentials. All it takes is a flat surface, a golf ball, and, if possible, a putting mat to mimic the feel of a green. Don’t have a putting mat? No problem – use a smooth carpet or even a hardwood floor as an alternative. With this simple setup, you can work on sharpening your putting skills without ever leaving your house.
What are some common mistakes beginners make when practicing putting drills?
When starting out with putting drills, beginners often stumble on a few common mistakes. One of the biggest missteps is putting too much emphasis on speed rather than accuracy, which often leads to erratic results. Another frequent issue is not developing a steady, consistent stroke, resulting in putts that veer off course or fall short. On top of that, many beginners skip over the critical step of reading the green and properly aligning their putts – both of which are essential for boosting precision and confidence.
By honing in on these key basics, you can sharpen your putting skills and lay a strong groundwork for your overall game.
Related Blog Posts
- 7 Common Putting Mistakes Beginners Make (And How to Fix Them)
- 5 Lag Putting Drills for Better Distance Control
- The Ladder Drill: Improve Putting Speed
- Best Drills From Short Putt Clinics
